• Skip to primary navigation
  • Skip to main content
  • Skip to footer
phone(866) 826-2993
Login / Register
search
shopping_cart

North Slope Chillers

Industrial Water Chiller Systems

  • Home
  • Solutions
        • Chillers
          • Freeze (40 to 75F)
          • Deep Freeze (10 to 45F)
          • Custom
          • Smart Chillers
        • Accessories
          • Fluxwrap
          • Icewraps
          • Keg Coolers
          • Tank Cooling
        • Misc
          • Air Handlers
  • Applications
        • Biotech
        • Cannabis
        • Chemicals
        • Dairy
        • Deionized Chillers
        • EDM
        • Fermentation
        • Food
        • Glycol Heaters
        • Hydroponics
        • Lasers
        • Plastics
        • Printing
        • Rental Chillers
        • Server Cooling
        • Welding
  • Learn
        • Resources
          • Register Warranty
          • Chiller Sizing Calculator
          • Chiller Terms
          • FAQ
          • Glycol Concentrations
          • Seasonal Maintenance Tips
          • Fulfillment Policy
        • About Us
  • Blog
  • Shop
  • Cart
  • Login / Register

NSC Admin

How Heating and Cooling are Used in the Epoxy Curing Process

NSC Admin · Dec 13, 2017 ·

curing epoxy on a floor

Epoxy is a go-to material for many industries because it’s strong, waterproof and lightweight. Its uses can essentially be divided into two categories: First, epoxy is often used as an adhesive to permanently bond objects together. Second, epoxy is used to create a lightweight, durable, scratch-resistant coating.

Epoxy and Reactions

Epoxy’s strength and durability comes from the reaction between resins that creates a strong adhesive bond. Epoxy curing is an exothermic reaction. Epoxies that haven’t cured properly generally have poor chemical, mechanical, and heat resistance properties.

Epoxy Curing Time

Epoxy curing time depends on the chemistry of the hardener. Some mixes require just one minute to set. These are best used for small jobs as you won’t have much time to work with the epoxy before it hardens. Other mixes will take much longer. Generally, epoxy that takes longer to set forms a stronger bond. It also gives you more working time.

garage floor epoxy
Factors of Epoxy Curing

While epoxy curing is simple, the factors involved must be carefully addressed for the mixture to properly set. First, the surface or surfaces that will be adhered or coated in epoxy must be properly prepared. Second, the elements of your epoxy mixture have to be properly combined. Next, epoxy application should be smooth and uniform. Finally, and most importantly, epoxy must be cured at the correct temperature.

Heating

The most important factor of  heat curing epoxy is maintaining the proper temperature. Improper or uneven temperature distribution can lead to discoloration or color variation, blushing, uneven gloss, brittle product, and poor inner-coat adhesion. Many epoxies cure at temperatures well above ambient air and require a heat source to provide a constant, specific setting temperature. Options include a heat box or oven. For large projects, heat lamps, hot water, or heating blankets can be used. Heating blankets provide the most consistent, reliable solution.

Cooling

Once epoxy has been mixed, the reaction (and curing) begin! While adding heat helps with proper curing, some situations call for colder temperatures. For example, you might need extra time to work with epoxy before it hardens. To keep epoxy from heating up (and hardening) too quickly, it is recommended that you mix your epoxy in a wide, shallow vessel. This creates a wider surface area for heat to escape (remember: curing is an exothermic process). You can also extend work time by keeping epoxy cool or cold while working and then adding heat when you’re ready for it to set.

Storing Mixed Epoxy

If, after finishing a project, you’re left with excess epoxy, it can be stored at cold temperatures to significantly slow or stall the curing process. It is recommended that you keep mixed epoxy stored at around 40°F for no more than a few days. Once you reheat the epoxy, the curing process can resume.

1/4 ton chiller from North Slope Chillers
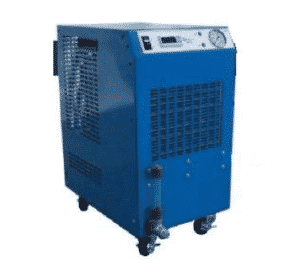
A Solution for Cooling Epoxy

An effective and reliable process cooling solution that can be implemented in the epoxy curing process is the North Slope Chillers injection molding chiller. It’s rated at ambient temperatures from 35º F to 100º F and features a portable design. If you’re interested in producing high-quality epoxy, consider using this chiller to help with total temperature control during the curing process.

DOWNLOAD THE CHILLER SELECTION GUIDE

Temperature Maintenance During the Beer Fermentation Process

NSC Admin · Nov 28, 2017 ·

beer bottles being tapped together in a cheersAncient Brewing Meets Modern Technology

Brewing is an ancient art that dates back thousands of years and is well-documented in most major civilizations throughout history. In modern times, technology has made this tradition less of an art, and more of a science. With the invention of the steam engine, thermometers, and other technology advancements, most beer brewing was done on a very small scale and was very inconsistent, and included adverse flavors. Recipes varied by region of the world, families, ingredients, and climate. Brewing had become an art that was perfected through generations using archaic techniques that only experience from trial and error could hone.  Methods and temperature control throughout the fermentation chilling process created a beer that is much different from the commonly consumed ales in the United States today.

Modern brewing has undergone its own revolution as the popularity and demand for small batch brews has grown. Microbreweries and home breweries have increased by over 40% in the last several years, with more than 1.4 million barrels of brew (1% of total U.S. production) coming from home brewers by 2017. Micro brewing is an ever-growing popular hobby that can be fairly easy to get into. The increasing availability and decreasing cost of process cooling equipment has enabled brewers to return to the roots of fermenting beer, but with a modern flare.

Fermentation Temperature Control

Regardless of the time or era beer was made in, fermentation was always the key to success. Fermentation is the process by which yeast turns the glucose in wort to ethyl alcohol and carbon dioxide gas. This is what gives beer its alcohol content and carbonation. The fermentation time varies depending on temperature, type of yeast used (dry or liquid) and whether you are producing a lager or beer. Beer takes about 1-3 days to ferment when dry yeast is used and approximately 8-14 days to ferment when liquid yeast is used. Because lagers ferment at a cooler temperature, the fermentation process takes 2 weeks or more.

An important factor to keep in mind during the brewing process is temperature . Ideal beer fermentation temperature is between 68 and 72° F. Lager requires lower temperatures, between 45 and 55°F. Fermenting above these ideal temperature ranges will result in the production of extremely fruity-flavored esters and harsh-flavored fusel alcohols.If the temperature gets too high, fermentation may stop altogether. Keeping your ale or lager within the ideal temperature range is important but can be difficult. Even when ambient temperatures are in the correct range, heat generated during the fermentation  can warm a 5 gallon batch of beer 10-15°F.

How to Keep Your Brew Cool

Historically, most beers were brewed during cooler months and stored in cellars or caves to maintain proper temperatures. Today, however, there are several steps that can be taken to help keep your brew at the correct temperature year-round.

Evaporation

You can use the cooling power of evaporation to your advantage by wrapping your carboy in a damp beach towel and placing it in a basin or tub filled with an inch or two of water. The towel will wick water from the basin and keep your brew cool as the water evaporates. This method may not be as effective in humid conditions, but the evaporation can be helped along with an electric fan kept pointed toward the carboy.

Air Conditioning

Another simple method of keeping your brew cool is to place your carboy
directly in front of an air conditioning vent. This will allow your brew to receive the initial cool blast of air before it circulates through your home. Ideally, this means you won’t have to crank down the temperature too low.

Ice

Some craft brewers recommend placing your carboy in a basin filled with water and adding 1-2 ice packs or frozen water bottles. The packs or water bottles should be replaced twice a day to keep your brew properly cool.

North Slope Chillers and Brewing

If you’re looking to produce a high-quality brewed beverage, it’s important that you choose a temperature control method that doesn’t involve a lot of guess work. Portable chillers are an effective option that will keep your brew at precisely the correct temperature with very little effort. This advanced water chiller requires only a power connection and is easy to set up and relocate. If you’re serious about quality brewing, consider adding a North Slope Chiller to brewing setup.

DOWNLOAD THE CHILLER SELECTION GUIDE
  • « Go to Previous Page
  • Page 1
  • Page 2
  • Page 3
  • Page 4

Footer

1949 South 4250 West
Salt Lake City, UT 84104
Phone: (866) 826-2993
Email: [email protected]

Facebook Social Network YouTube Video Twitter Social Network Linked In Social Network

Recent Posts

  • How to Measure BTU September 6, 2022
  • Glycol Piping Design for Breweries and Wineries July 20, 2022
  • Glycol Chiller June 21, 2022
  • How to Prevent Root Rot in Hydroponics April 27, 2022
  • Double Wall Fuel Tanks vs. Single Wall Fuel Tanks November 23, 2021

DOWNLOAD THE CATALOG

$(document).ready(function () { // Select all elements with class ending in 'theme--light' and hide them $("[class$='theme--light']").css("display", "none"); });