• Skip to primary navigation
  • Skip to main content
  • Skip to footer
phone(866) 826-2993
Login / Register
search
shopping_cart

North Slope Chillers

Industrial Water Chiller Systems

  • Home
  • Solutions
        • Chillers
          • Freeze (40 to 75F)
          • Deep Freeze (10 to 45F)
          • Custom
          • Smart Chillers
        • Accessories
          • Fluxwrap
          • Icewraps
          • Keg Coolers
          • Tank Cooling
        • Misc
          • Air Handlers
  • Applications
        • Biotech
        • Cannabis
        • Chemicals
        • Dairy
        • Deionized Chillers
        • EDM
        • Fermentation
        • Food
        • Glycol Heaters
        • Hydroponics
        • Lasers
        • Plastics
        • Printing
        • Rental Chillers
        • Server Cooling
        • Welding
  • Learn
        • Resources
          • Register Warranty
          • Chiller Sizing Calculator
          • Chiller Terms
          • FAQ
          • Glycol Concentrations
          • Seasonal Maintenance Tips
          • Fulfillment Policy
        • About Us
  • Blog
  • Shop
  • Cart
  • Login / Register

Uncategorized

Home Brewing: Son of a Fermentation Chiller

Brooke Loeffler · Jun 25, 2019 ·

Son of a…what?

Home brewing has become a very popular practice in recent years. Quick digital access to brewing methodology, online ordering of high quality grains/hops/yeasts, and a growing nationwide appreciation for craft brewing have all fed into a renaissance movement of brewing as an artistic science. With all these ingredients and instructions at our fingertips, finding the right method for you can be a process of trial and error. Let’s examine one of these DIY methods in greater detail…the “son of a fermentation chiller.”

download our brewing guide

Fermentation Stage

So you have carefully selected your grains, mashed them, malted them, turned them into wort, and cooled your liquid wort so it is ready to be pitched to your yeast. The most crucial part of the brewing process is about to begin…fermentation. The fermentation stage is a tricky one, in that it can ruin all your hard work leading up to this point if your brew’s environment is not carefully protected.

The most important environmental factor in fermentation is temperature.  Under the right conditions, yeast will wake up, consume the sugars in your wort, and turn them into alcohol and carbon dioxide.  Under the wrong conditions yeast that is too cold will go dormant and not finish fermenting; yeast that is too hot will produce off flavors and aromas or even die off completely.

Enter Fermentation Chambers

Fermentation chambers are specially designed containers to protect the environmental conditions while your brew ferments.  They not only protect your brew’s temperature, but reduce exposure to excess oxygen and unwanted pathogens.

There are many different fermentation chambers used by home brewers. They vary widely depending upon batch size, cost, how much brewing space you have, and how much of your time and energy they consume. Since fermentation is an exothermic process, your brew will continuously generate heat as it ferments.  So how do you keep your fermentation temperatures in the ideal zone without babysitting your brew around the clock? The solution is a fermentation chiller.

Son of a Fermentation Chiller

Home brewers use many methods to chill their fermentation chambers and one of the more popular DIY methods is to construct a “son of a fermentation chiller.”

First designed by home brewer Ken Schwartz in 1995, the whimsically named son of a fermentation chiller has become a common creation among American home brewers. The plans have been redesigned through the help of feedback from other home brewers, but the basic concept is the same.

This fermentation chiller involves building a chamber made of thick insulation foam boards. The brew is housed inside next to rotating jugs of ice, a fan, and thermometer.

Weighing Pros and Cons
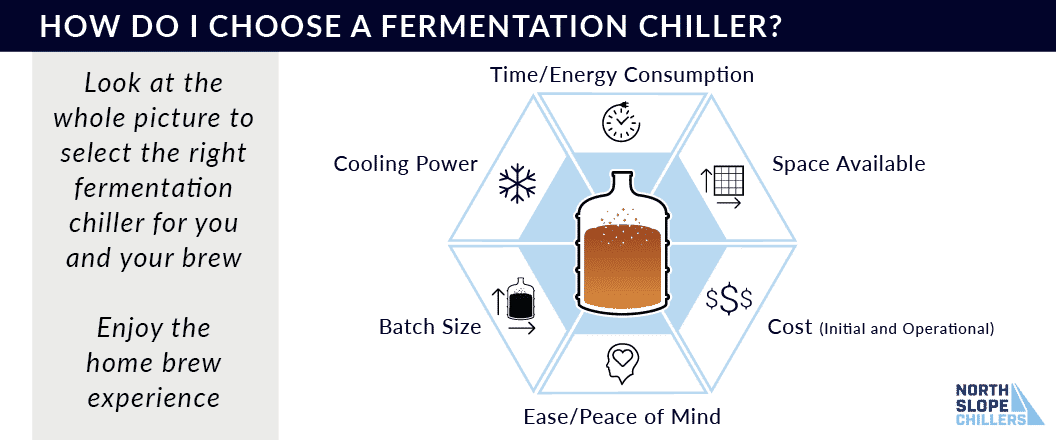
North Slope Chillers infographic on selecting a fermentation chiller

Cost

One of the most appealing aspects of the son of a fermentation chiller is the cost. Low cost materials can be easily purchased and if you possess basic construction skills, it can be easily assembled. 

There may be additional costs in the future such as purchase of a second thermometer to make sure you are not just measuring the air temperature inside, but the temperature of your brew itself.

However, cost is only 1 of the factors to consider when looking at your home brew fermentation options.

Batch Size

The larger your brew batch, the more heat will be generated by the fermentation process. The son of a fermentation chiller can be adapted to accommodate up to 7 gallons, but for larger batches, fans and ice will not be sufficient to protect your brew from thermal stress.

Cooling Power

The appeal of buying a small fan to save upfront costs can cause problems in the future. Make sure you have enough cooling power to handle a large, constantly self-heating container of wort.

Time and Energy Consumption

Before home brewing, you need to carefully look at how much time and energy you have available to switch out frozen jugs as they melt and need to be replaced.

Using the son of a fermentation chiller also means spending time carefully monitoring your thermometer.

Space Available

When using a son of a fermentation chiller, the footprint of the chiller may be small, but you will need ample freezer space to store your rotating frozen jugs.

Ease and Peace of Mind

Picture how you would like your home brewing experience to pan out. Balancing work and effort with the enjoyment of sharing your batch with your family and friends is an important aspect of home brewing. Investing in a home brew system can provide long term enjoyment if you carefully weigh your chilling options before hand.

North Slope Chillers Solutions

Be sure to look at the whole picture when embarking upon your home brewing journey.  Low cost options seem convenient at first, but can lead to frustrations in the future. Using a reliable fermentation chamber chilling jacket, and fermentation chillers can save you time, energy, and provide more consistent brewing results.  North Slope Chillers Fluxwrap jackets and fermentation chillers can transform you from home brew babysitter, to home brew master.

Contact us to find the right fermentation chilling solution for your needs:

(866) 826-2993 [email protected]

A Beginners Guide To Cannabis Extraction

Emma Pollock · Jun 24, 2019 ·

What are cannabis extracts and what are they used for?
The goal of cannabis extraction is to create a product with a high concentration of cannabinoids. Cannabis extracts come in different forms including powders, rosins, and oils and are believed to have powerful medicinal properties. 

dOWNLOAD OUR COMPLETE CBD GUIDE

Cannabis Extraction

 The goal of cannabis extraction is to generate a high-concentrate cannabinoid (the active ingredients in cannabis)  product for potential beneficial use.

Timothy Welty, chair of the department of clinical sciences at Drake University’s College of Pharmacy and Health Sciences, in Des Moines, Iowa, explains that “CBD (a cannabinoid found in cannabis plants) is kind of a tricky drug because it’s not very well absorbed orally. Less than 20 percent of the drug is absorbed orally. If it isn’t made in the right way, you may not be getting much drug into your systemic circulation.”

Common Cannabis Extraction Methods

There a few different methods employed when extracting active ingredients from cannabis plants. Here are a few of the more common methods:

Solvent Extraction

For this method, cannabis trimmings are steeped in ethanol. The ethanol is evaporated, leaving the plant extracts behind.

CO2 Extraction

This method is extremely technical but yields the most potent results. Supercritical CO2 passes through plant trimmings, dissolving the extracts. The extracts are then separated from the CO2.

Ice Water Extraction

This method results in what’s most commonly referred to as “Bubble Hash”. Cannabis trimmings are mixed with ice. Water is added and the mixture is strained through several layers of mesh. 

(For more details on cannabis extraction methods, check out this blog article. )

THC vs CBD

Quality cannabis extracts contain a high concentration of cannabinoids. The two main players when it comes to cannabinoids are tetrahydrocannabinol (THC)  and cannabidiol (CBD). Put simply, THC is what gets you “high” while CBD is often sought after for its claimed medicinal properties.

THC

Tetrahydrocannabinol (THC) is the most potent psychotic found in cannabis plants. As mentioned above, it’s found in higher percentages in marijuana. Besides giving you  a “high,” THC can cause feelings of lethargy and dysphoria and may even make anxiety and seizures worse.

CBD

Cannabidiol (CBD) does not have intoxicating effects like THC. CBD oil is often used to treat epilepsy and pain. Some claim that CBD relives sleep issues, depression, anxiety, and other mental health disorders. It may even counteract the psychoactive effects of THC. CBD usage has been linked with side effects like decreased appetite, fatigue, weakness and sleeping problems.

Hemp vs Marijuana

All cannabis extracts start with a cannabis plant. While the terms cannabis, marijuana and hemp are often used interchangeably (i.e., CBD oil is often referred to as marijuana oil) , if you want to understand cannabis extracts, it’s important to know the difference between the three.

Cannabis is a family of plants. Marijuana and hemp are two different types of plants that fall under the umbrella of cannabis. While marijuana typically has a higher percentage of THC, hemp usually has a higher percentage of CBD

Common Uses for Cannabis Extracts

Research on the benefits of cannabis extracts is limited. Studies, however, have indicated that extracts, specifically CBD oil, can help with the following symptoms and diseases:

Epilepsy

Epilepsy is the only condition with significant scientific evidence that supports CBD as a viable treatment option. Three separate clinical trials have indicated that pharmaceutical-grade CBD reduces seizures with minimal side effects. The CBD-based medication Epidiolex is currently used to treat two rare forms of epilepsy: Lennox-Gastaut syndrome and Dravet syndrome.


Pain/Inflammation

While there hasn’t been enough human trials to confirm CBD’s effect on pain and inflammation, animal trials indicate it could be a successful treatment. Some research has found that CBD reduced levels of chronic inflammation in rats and mice.


Anxiety

Some human clinical trials suggest that CBD could be an effective treatment for anxiety disorders including generalized anxiety disorder, panic disorder, social anxiety disorder, obsessive–compulsive disorder, and post-traumatic stress disorder.

Cancer

An article published in the British Journal of Clinical Pharmacology that CBD can prevent cancer cells from spreading. While more research is needed to further support this claim, CBD’s anti-cancer properties are currently being researched throughout the United States.

Counterflow Wort Chillers

Brooke Loeffler · Jun 17, 2019 ·

Go With Against The Flow

The brewing process is a roller coaster of temperatures…warm, hot, boiling/roasting, rapid cooling, maintaining warmth, stable aging and storing. Hitting the right temperatures at the right times ensures the chemical reactions finish their work and produce a high quality brew with all the desired flavors, aromas, alcohol levels, and colors intact. Let’s look at the most drastic temperature change in the brewing process…wort cooling.

download our brewing guide

Wort Creation

Brews begin their lives as starchy grains that are sprouted, cracked, and then steeped in hot water. After this hot mash converts starches into sugars, the solids and liquids are separated (through lautering) and the result is…liquid wort. Before these sugars can be pitched (fed) to yeast, they need to be sanitized. Wort must be heated to its boiling point (212° F) to kill any harmful pathogens that can compromise the fermenting process that follows.

Wort Cooling

Before pitching wort to your selected yeast strains, it must be cooled, and quickly.

What’s the Rush?

Just like dairy pasteurization, rapid cooling ensures the wort passes through the luke warm zone (80°-140°F) as fast as possible. Unwanted microorganisms, like bacteria or wild yeasts, love the luke warm zone and can infiltrate your brew if it lingers in this temperature zone for too long. A lengthy stay in this zone can also increase the production of dimethyl sulfide (DMS) which will make your brew taste unpleasantly like canned corn.

Prepare to Pitch

Quickly cooling your liquid wort also prepares it to be pitched to your yeast. Yeast only ferments at very specific temperatures, and each strain prefers a different temperature range. If the liquid wort is too hot it, will instantly kill the yeast upon contact and your brew will never ferment. Careful research will let you know what temperatures your chosen yeast cultures prefer so you can prepare your wort accordingly.

There are multiple wort cooling methods, and some are more efficient than others

Counterflow Chilling

The most effective method of wort chilling is counterflow chilling.

North Slope Chillers infographic depicting how a counterflow wort chiller works

A counterflow wort chiller is a coiled section of double layered tubing.  Hot liquid wort is gravity fed through the inner tube in one direction, and cold liquid is pumped through the outer tube in the opposite direction.  This counterflow in opposite directions greatly speeds up the heat transfer process and cools the wort quicker.

Other cooling methods, such as immersion chilling, rely on cool baths to chill the wort.  But still water baths are much less effective than flowing water. Counterflow chilling keeps the cooling liquid and wort continuously flowing in separate tubes so they never come in contact with each other; the only thing that passes between the two liquids is heat.

Wort Chilling With North Slope Chillers

The perfect accessory for your counterflow system is an industrial chiller that can cool your wort down as quickly as possible.  North Slope Chillers’ lines of industrial chillers contain powerful pumps to provide cold water on demand to maximize your counterflow’s effectiveness.

Contact us to find the right wort chilling solution for your needs:

(866) 826-2993 [email protected]

Water Cooled TIG Welding

Brooke Loeffler · Jun 14, 2019 ·

Stay Cool Around the Molten Pool

When your hand is inches away from a pool of molten metal, temperature control is of utmost importance. No glove is going to completely protect you when a TIG torch runs too long, and too hot for comfort. Water cooling gives you the time to complete high quality welds without compromising safety or weld integrity.

download our catalog
Masked welder operating a TIG torch

What is TIG Welding?

Tungsten Inert Gas welding (TIG welding) is also known as Gas Tungsten Arc Welding (GTAW). TIG welding creates high quality welds that can be used with a wide variety of metals. TIG welders use a foot pedal or finger remote to control the amperage and the heat while welding. They are thinner and provide the welder with more dexterity and flexibility than other welding torches.

What causes a TIG welder’s temperature to increase?

TIG Welders generate a tremendous amount of heat, and there are many factors that contribute to a torch’s temperature. These temperature variables can create thermal stress that is harmful for the equipment, the welder, and the welds.

Duration of Use

Welders have a duty cycle or period of time in which they can safely and effectively operate. The longer the welder is in use, the heat will continue to transfer through the torch handle.

Type of Shielding Gases

Shielding gases create an ideal atmosphere around the torch. Some gases (like nitrogen and oxygen) can create welding defects if present. Argon is the most common shielding gas used in welding. However including helium in the shielding atmosphere (which increases welding penetration and speeds) the temperature will also increase.

Current

In general, welding requires high currents in order to produce the heat necessary to fuse metal. TIG torches can operate with a number of amperage ranges and for some lower ranges, an air-cooled welding torch is sufficient. However, for any welding applications over 200 amps, a water cooled torch is absolutely necessary.

Distance and Angle of Torch

The space between the torch and the welding material, and the angle at which the torch is being held can also cause overheating.

Why Water Cool TIG Welders?

North Slope Chillers infographic showing the benefits of water cooling TIG welding torches

Using a water cooled welding chiller prevents temperature variables that you have forseen and those temperature variables that have not been forseen.

Water cooled torches have longer duty cycles without damaging the equipment. A water cooled torch is easier to hold and the welder doesn’t have to rush to finish the weld before the torch gets hot.

More effective cooling also enables a welder to use helium in the shielding atmosphere which increases the welder’s performance. Water cooled torches can also operate at a higher amperage and create a deeper fusion in the welds.

One downside to water-cooled torches is that water cooling systems can be bulky and it can be difficult to be as mobile as air-cooled torches.

North Slope Chillers offers a range of portable water cooled chillers that can help you take your welding operation anywhere.

Contact us to find the right welding cooling solution for your needs:

(866) 826-2993 [email protected]

Keeping Roots Healthy With Hydroponic Water Chillers

Emma Pollock · Jun 12, 2019 ·

Why should you add a water chiller to your hydroponic setup?

Hydroponic water chillers are used to carefully control the temperature of hydroponic water. Controlling the water temperature keeps the root zone healthy and increases nutrient absorption. While water chillers can be relatively expensive, they provide the efficiency and ease of use that other cooling solutions simply cannot.

When it comes to any type of gardening, the root zone is where the magic happens. The root is the start of a plant’s vascular system– where nutrients are absorbed. For healthy plants, it’s crucial that this area be well-cared for.

One especially amazing aspect of hydroponics is the opportunity for careful control and care of the root zone. More specifically, growers have the opportunity to precisely control the temperature of the roots.

Why Roots Need to Stay Cool

When hydroponic water and, consequently, the root zone, get too warm, the plants can wilt, growth can be stunted, and dangerous pathogens can breed. This is predominantly caused by low oxygen. The warmer a solution gets, the less oxygen it’s able to support and transport to the root zone. What’s more, as temperatures rise, root zones actually need more oxygen! High hydroponic water temperatures put plants in a tough situation: roots need more oxygen but nutrient solutions are actually carrying less oxygen than usual.

Enter: Water Chillers

While there are plenty of other options for keeping hydroponic water cool, water chillers are by for the most effective solution. While chillers have a higher price tag that other cooling methods, serious hydroponic growers often find they pay for themselves in time and physical labor saved.


Pros and Cons of Using a Water Chiller in Your Hydroponic Garden

If you’re not sure whether you’re ready to add a chiller to your setup, it can be helpful to look at the benefits and a few potential drawbacks.


Pros

  • High oxygen levels- Water chillers provide the cool temperature necessary to hold increased quantities of dissolved oxygen.
  • Higher root growth and increased nutrient absorption- this is a direct result of increased oxygen levels.
  • Decreased risk of harmful pathogens- Highly oxygenated, cool environments prevent the growth of pathogens that could damage plants.
  • Adaptable- no matter what your setup (ebb and flow, drip, nutrient film technique, etc), a chiller can easily be incorporated into your system
  • More precise control- compared to other cooling methods, water chillers offer more precise control. They can often be set to specific temperatures.
  • Require less time and work- once it’s set up, utilizing a water chiller is often as easy as flipping on a switch.

Cons

  • Expense- While they’re becoming more affordable, water chillers are still a fairly significant expense. Some growers may have a hard time justifying the purchase.
  • Noise- Most hydroponic equipment generates some type of noise and chillers are no exception.

How to Determine Hydroponic Water Chiller Size

If you’ve decided a chiller is for you, you’ll need to determine the cooling power your hydroponic setup requires. When chillers are too small, they won’t function properly. While oversized chillers won’t harm plants, there’s no need to spend more money than you need to.

To figure out what size chiller you’ll need, follow these steps:

  1. As accurately as you can, calculate the total gallons of water in your hydroponic system.
  2. Next, you’ll want to get your grow room to maximum temperature. At the hottest part of the day, turn on any equipment in your garden that produces heat.
  3. Bring your water down to your desired temp (typically 60-70F) using ice packs or frozen water bottles.
  4. Once you’ve reached your desired temperature, remove the ice packs and let the water circulate.
  5. After letting the water circulate for an hour, take the temperature again.
  6. Subtract your starting temp from your temperature after one hour – this is your temperature differential.
  7. Next, use the following formula to calculate the BTUs you need:

Gallons of Water X 8.34 lbs (weight of a gallon of water) X Temperature Differential

8. Finally, use this formula to calculate the total tons of cooling capacity required then oversize by 20%.

Tons = BTU/hr. ÷ 12,000

If you need any help determining which chiller size is best for your hydroponic setup or have any other questions concerning incorporating a chiller into your garden, please feel free to contact us at (866) 826-2993 or [email protected]. We’d love to help.

  • « Go to Previous Page
  • Page 1
  • Interim pages omitted …
  • Page 9
  • Page 10
  • Page 11
  • Page 12
  • Go to Next Page »

Footer

1949 South 4250 West
Salt Lake City, UT 84104
Phone: (866) 826-2993
Email: [email protected]

Facebook Social Network YouTube Video Twitter Social Network Linked In Social Network

Recent Posts

  • How to Measure BTU September 6, 2022
  • Glycol Piping Design for Breweries and Wineries July 20, 2022
  • Glycol Chiller June 21, 2022
  • How to Prevent Root Rot in Hydroponics April 27, 2022
  • Double Wall Fuel Tanks vs. Single Wall Fuel Tanks November 23, 2021

DOWNLOAD THE CATALOG

$(document).ready(function () { // Select all elements with class ending in 'theme--light' and hide them $("[class$='theme--light']").css("display", "none"); });