• Skip to primary navigation
  • Skip to main content
  • Skip to footer
phone(866) 826-2993
Login / Register
search
shopping_cart

North Slope Chillers

Industrial Water Chiller Systems

  • Home
  • Solutions
        • Chillers
          • Freeze (40 to 75F)
          • Deep Freeze (10 to 45F)
          • Custom
          • Smart Chillers
        • Accessories
          • Fluxwrap
          • Icewraps
          • Keg Coolers
          • Tank Cooling
        • Misc
          • Air Handlers
  • Applications
        • Biotech
        • Cannabis
        • Chemicals
        • Dairy
        • Deionized Chillers
        • EDM
        • Fermentation
        • Food
        • Glycol Heaters
        • Hydroponics
        • Lasers
        • Plastics
        • Printing
        • Rental Chillers
        • Server Cooling
        • Welding
  • Learn
        • Resources
          • Register Warranty
          • Chiller Sizing Calculator
          • Chiller Terms
          • FAQ
          • Glycol Concentrations
          • Seasonal Maintenance Tips
          • Fulfillment Policy
        • About Us
  • Blog
  • Shop
  • Cart
  • Login / Register

Mark Lehnhof

How to Measure BTU

Mark Lehnhof · Sep 6, 2022 ·

What is BTU?

BTU is short for British Thermal Unit. It is defined as how much heat it takes to raise one pound of liquid water by one degree Farehnheit. 

How much is a BTU?

A single BTU is very small. So small, in fact, that you could only notice the heat if you were directly near its source. 

The United States Department of Energy states the following: 

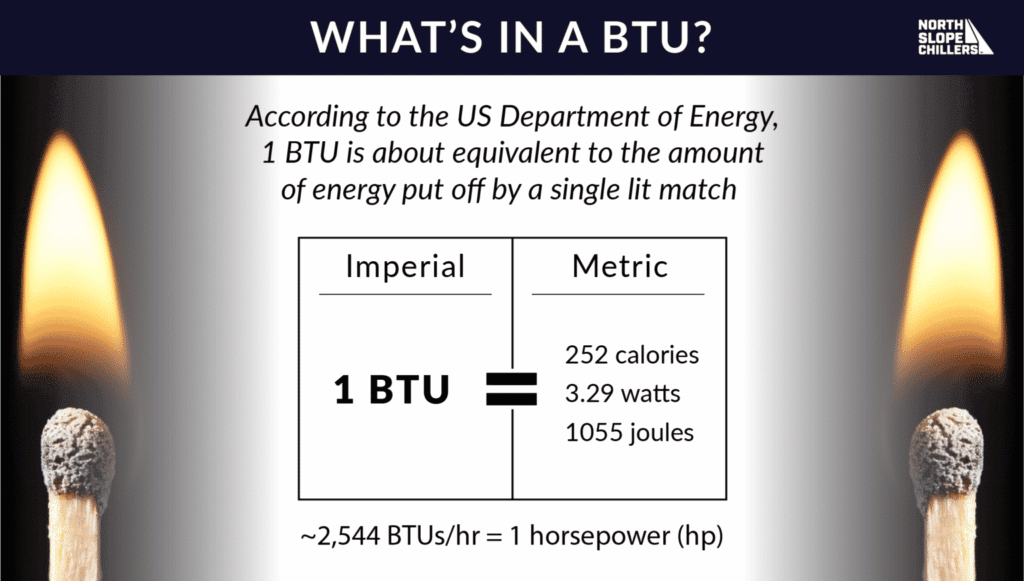
A single Btu is very small in terms of the amount of energy a single household or an entire country uses. In 2020, the United States used about 92.94 quadrillion Btu of energy. Written out, 1 quadrillion is a 1 followed by 15 zeros: 1,000,000,000,000,000.
BTUs are usually pretty high in number when using them as a measurement for industrial purposes. You usually won’t find readings for heat measurement when you’re only dealing with a few BTUs. That’s because (for the most part) heat within a system begins to matter when it starts to influence the entire interior space of a building. For example, the average home size in the United States is a little more than 2,000 square feet. A home that size in a standard climate (not too hot in the summer, not too cold in the winter) will measure about 90,000 BTU. 

Where does BTU come from?

There isn’t much that is British about the British Thermal Unit. Oddly enough, the United States is one of the few countries that regularly uses BTU to measure heat. Other nations, including the United Kingdom (Great Britain), refer to heat as a unit of energy. For this, they measure heat using joules and calories. One BTU is equal to about 1055 joules, which also equals roughly 252 calories.

The beginning of BTU

BTU came into the world as the steam engine began to make its mark on the world. With the Industrial Revolution getting underway in the British Empire during the 1700s, steam power was seen as an efficient new way to provide energy for new factories and heavy equipment. 

As wonderful as steam engines were to the emerging manufacturing scene, it was clear that these powerful machines needed to be cautiously calibrated and maintained extremely well. Unregulated heat often resulted in everything from loss of steam to boiler explosions, leading to lost production and injuries. Sometimes, in tragic boiler explosions, workers and others were killed.  

Here’s more about the history of BTU from our past blog article, “All About BTUs”: 

After the 17th Century, as steam powered technology became more common, scientists needed a more precise method of measuring heat. Steam engines require careful calibration and calculation to make sure pressure limits stay within safe boundaries. As a result, British scientists began refining the metrics they used to measure heat energy. The exact origin of the British Thermal Unit (BTU), and who coined it, is unclear. However, engineering publications began referencing BTUs in the late 19th century. It became a standard thermal energy unit for the imperial measurement system.

Meanwhile in 19th Century France, Nicolas Clement was formulating a unit of heat measurement that became known as the calorie. Calories are now the standard thermal energy unit for the metric measurement system.

Is BTU used in the metric system?

BTUs are a part of the Imperial system of measurement, including feet, inches, pounds, gallons and miles. While not used in the metric system (the metric system utilizes calories and joules), they play a critical role in determining the price of natural gas in the United States. It seems like BTU will remain a staple as a unit of measurement due its impact on the nation’s economy. 
How to measure BTU output

As stated at the beginning of this blog post, one BTU is the amount of heat it takes to raise one gallon of water by one degree Fahrenheit. The same formula works for heating air, but with a few minor changes. 

How to measure BTU for a room

When doing the math to figure out how much heat it takes to raise the temperature of a room, remember this: one BTU is enough to raise the temperature of about 30 ft3 of air by one degree Fahrenheit. 

There are three steps for finding the BTU for a room: 

  1. Measure the length, width, and ceiling heighth of the room
  2. Account for the EPA’s recommended BTUs per square foot formula
  3. Add environmental factors that could impact heating and cooling resources in the room. 

Measure

First, measure the length of the room you intend to find BTUs for. Also measure the width and the height of the room up to the ceiling. Multiply the length and the width to find the square footage. We’ll need the colume of the room separately later on, and to get that you’ll multiply the square footage by the ceiling height. This gets tricky for any room that isn’t rectangular or square, but do the math and you can move on to the next step. 

The best way to understand anything is to practice it, so let’s say the room we’re trying to heat is 1,000 square feet with a 10-foot ceiling height. That’s a total volume of 10,000 ft3.

EPA Formula

Once you have figured out the dimensions of the room, plug those numbers into the U.S.’s Environmental Protection Agency’s recommendations for how many BTUs are needed for any given building interior. The EPA says that for every one square foot of space, you will need at least 20 BTUs. 

In our example, we have a room that has an interior of 1,000 ft2 that needs to be warmed or cooled. 1,000 times 20 is 20,000. This means that it takes 20,000 BTU to be sufficient to warm or cool a room that is 1,000 ft2.

Factors That Can Affect the Amount of BTUs Needed

Though we’ve now calculated the exact BTU for the room, we’re not quite done. Unless the room you plan on measuring BTUs for is a concrete box with no way in or out, you will need to consider anything that could have an impact on room temperature. For example, a window could impact how cold or how hot the room gets if the other side of the window is outdoors. 

Other examples include: 

  • Location: is the room within the interior of the building? Are any of the walls of the room used as the edge of the building?
  • Insulation: how well is the room insulated? A building made solely out of cinderblocks will retain heat poorly compared to a wooden building with fiberglass insulation. 
  • Body heat: how many people will be in the room? Humans generate a lot of heat, and have the ability to significantly heat up a room themselves. 
  • Open doorways: people moving in and out of the room will disrupt any temperature consistency. 
  • Vents and windows: warm air can leak out of a room through many ways. Windows and vents are primary culprits in heat loss. Glass windows, as well as the window frames themselves, will conduct heat away from the room. Vents allow for airflow to move in and out of the room, making consistent air temperature an even greater variable. 
  • Humidity: The amount of BTUs needed for your process cooling system will also be affected by the ambient temperature and humidity. If the ambient temperature is high, you will need more BTUs to achieve the desired cooling effect. If the humidity is high, you will need more BTUs to remove the moisture from the air.

Additional tips for figuring out BTU

  • Remember, a low BTU count isn’t just a lack of heat: it’s how you go from a higher temperature to a lower temperature. The amount of BTUs needed for a room to cool down will always be less than how many BTUs it takes to warm the room up.
  • Heat is heat, no matter what is used to create it. From electrical coils to burning wood, all heat is measured in BTU. 
  • Learning how many BTUs are needed to heat up a room is just as important as how many BTUs are needed to cool down the room. 

How to select the right size process cooling unit

Choosing the right process cooling unit depends on what you’re using it for. If you’re trying to manage the temperature in a room, you’ll want to select a larger unit that feeds cooled air directly into the environment. If you plan on using your chiller unit to lower temperatures on specific materials, a smaller unit would make more sense. 

At North Slope Chillers, we have every size of chiller available organized into three categories: Frost, Freeze, and Deep Freeze. Our engineers can help you calculate the BTUs needed to manage temperatures for your chilling needs. We offer custom chilling solutions that can fit every chilling need you have. 

Email us at [email protected] or give us a call at (866) 826-2993 to get started on your path to chilling peace of mind. 
Glycol Piping Design for Breweries and Wineries

Mark Lehnhof · Jul 20, 2022 ·

In the U.S., there are over 9,200 commercial breweries, from local craft breweries to behemoth international brands. Combine those with over 11,000 wineries, and you have a tremendous production of fermented beverages. 

What is the one thing in common these businesses need? A way to cool and control fermentation. Fermentation is a natural and essential process in beer and wine production. To have consistent results, brewers and winemakers must maintain temperatures throughout the brewing and fermentation processes. Glycol chillers and tank piping systems are the answer.

This post will cover the best practices for designing brewery glycol piping systems and other cooling considerations for your brewery or winery operation.

Why Use Glycol in Brewing?

There are two types of Glycol-based coolants,  ethylene glycol, and propylene glycol.

Glycol mixed with water is a heat transfer fluid, which is particularly important in brewing. The mixture circulates through piping to and from fermentation chillers to cool fermentation tanks and mash tuns.

Glycol lowers the freezing point of water, allowing the liquid to flow below freezing temperatures. Different glycol concentrations result in different freezing point temperatures. The lower temperature required means a higher glycol-to-water ratio.

There are several processes in which it is critical to lower or maintain the temperature. For example, cooling the wort after the initial boiling process, maintaining a steady temperature during fermentation, and cooling the beer after fermentation.

Glycol Piping Design in Breweries and Wineries

Fermentation is a natural part of the beer and winemaking process that creates heat. Commercial breweries and wineries need a glycol piping layout design to control the temperature and remove excess heat. For example, breweries need to cool the mash tun and lauter tun. Wineries must cool inside the fermentation tanks to provide optimal environments for the yeast to thrive and flavors to develop.

Avoiding Extreme Temperatures

High temperatures will affect the fermentation rate and the resulting flavor of the product. Glycol piping design ensures that temperatures are consistent and within the manufacturer’s recommendations throughout the process. Glycol cooling control leads to a more consistent product from brew to brew. 

Here is a table of the ideal fermentation temperatures of most beer and wine.

ProductIdeal Fermentation Temperature
Red Wine70°F to 85°F (20° to 30°C)
White Wine45°F to 60°F (7° to16°C)
Ales55°F to 70°F (13° to 21°C)
Beer40°F to 54°F (4 to 12°C)

For additional information, check out our blog, “Types of Fermentation.”

Using glycol to cool the different vessels is more efficient and cost-effective than cooling with water alone. It’s a preferred method because the water temperature of the facility’s water source may vary. A glycol system can cool a greater volume of liquid in a shorter time. 

By pumping glycol through coils or pipes in fermentation tanks, the excess heat from the tank transfers into the glycol from the vessel’s contents. The control of temperatures allows for natural yeast fermentation at the correct temperature for that product. 

Breweries and wineries need a glycol piping design specific to their industry. Understanding the process and how the glycol will work within the system is essential before designing the most efficient and effective glycol cooling system. 

How to Size the Glycol Piping for Your Brewery or Winery

There are two considerations when sizing brewery glycol piping or for a cooling system.

  1. The maximum glycol flow rate does not exceed the maximum rated capacity of the pump.
  2. The pipe size should provide the least amount of pressure.

The exact application will determine the specifics of sizing.

The first step in sizing your glycol piping is determining the cooled surfaces’ total heat load. During the brewing or fermentation process, the equipment will have hot spots that require cooling. 

To identify the amount of heat in your brewery or winery, you can use the following calculation:

Q = μ × A × ΔT, 

Where Q = total heat load in BTU/hr 

μ = the coefficient of thermal transfer for the material

A = the surface area where the fluid is in contact

ΔT = the difference between the fluid’s temperature and the surrounding environment’s temperature. 

Once you’ve calculated the total heat load, you can determine how much glycol is required. You can use the following equation:

G = Q × C × H × F × ΔT 

Where G = amount of glycol needed in gallons

Q = total heat load in BTU/hr.

C = the heat capacity of the liquid glycol in BTU/gal

H = the difference between the maximum and minimum temperature

F = the flow rate of the glycol in gallons/hr.

ΔT = difference between the maximum and minimum temperature.

To make it simpler, here is a Glycol calculator.

Types of Brewery Equipment that Require Glycol Cooling

There are five stages of commercial beer brewing that require cooling. 

  1. Cold water tank – Used to store cold water used to cool other vessels quickly.
  2. Wort Cooling – Cools the liquid in the Mash tun and brew kettles.
  3. Fermentation or Bright tank – This is where most fermentation occurs.
  4. Condition Tank – Pressurized tanks are used to add carbonation to the beer. 
  5. Packaging processing line – Keeps the finished beer at a low temperature for bottling.

Glycol cooling systems allow for greater temperature control.

Factors To Consider When Designing a Glycol System

The glycol system design must consider the tank size, the flow rate, and heat exchangers. 

When selecting the flow rate, you must consider the total volume of glycol needed for the mash and lauter tuns and the tanks. When choosing heat exchangers, you must consider the type of glycol and the temperatures required for the facility. For instance, if you’re cooling the fermentation tanks with a glycol and water mixture, that mixture should be around 60°F.

Installation Tips for a Successful Glycol Piping System

If you are installing a glycol cooling system for the first time, here are a few pro tips to help you:

  • Use stainless steel or copper piping
  • Prior to installing the piping system, clean the pipes to remove any debris 
  • Make sure the lines are dry
  • Always check that the glycol system has the correct amount of glycol
  • Use a temperature gauge to monitor the glycol’s temperature
  • Keep glycol lines separate from other piping in the system to prevent glycol contamination and reduce noise
  • Insulate all pipes to minimize heat loss and maximize energy savings
  • Place the glycol inlets and outlets 45 degrees off of the back. It’s a good use of the space between the tanks or a wall

Before you commit to any system, hire an experienced consultant who can walk you through the entire process to avoid costly mistakes.

Guidelines for Designing Glycol Piping Systems for Breweries and Wineries

There are two elements for facilities using multiple tanks to ensure proper flow to each vessel. Installing the correct sized glycol chiller and planning for a glycol piping system.

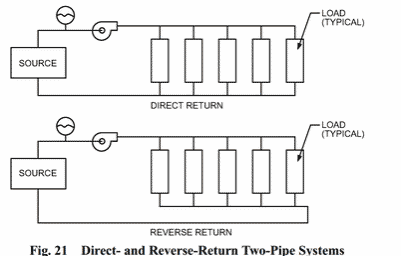
A properly sized chiller ensures your facility stays at peak production. A well-designed system begins with a glycol piping diagram to evenly distribute the cooling from your chiller to the tanks. The best way to ensure the tanks closer to the chiller don’t receive more glycol cooling than others is to design a reverse return piping system.

Glycol Piping Diagram [Source]

A reverse return piping system extends the return leg using the same length of piping (supply + return) to all loads. Directing the flow in one circular pattern results in an even pressure drop between the loads. This glycol loop design equalizes the glycol flow and cooling to each tank.

Minimizing the number of bends and fittings in the glycol piping system will reduce pressure drop and increase the life of the piping. It’s best to keep the pressure drop low so there is less stress on the rest of the system. High-pressure drops can increase the noise and reduce the life of the system.

When choosing the proper glycol refrigerant, either propylene or ethylene, the choice will depend on your local building code and regional, state, or federal requirements. Having a dedicated glycol tank keeps the system charged. Glycol tanks or glycol reservoir tanks typically handle 125 to 250PSI pressures.

Before commissioning the glycol piping system, you’ll want to run water through it to reveal leaks, remove trapped air, and avoid wasting costly glycol.  

Don’t forget to design accessibility into the system. Make access easy for maintenance and repairs.

Good Piping Design Means Consistent Products

Microbreweries are making a comeback, creating more demand for glycol piping and design.

The brewing and winemaking process is complex and requires specific temperatures for fermentation. When designing glycol piping, you must consider the volume of water you’re trying to cool and how many pieces of equipment need cooling, then calculate the total amount of heat your system must handle. Lastly, you must determine how much glycol is required for each piece of equipment. For specific questions, contact the glycol chilling experts at North Slope Chillers.

Glycol Chiller

Mark Lehnhof · Jun 21, 2022 ·

Brewing beer is as much science as it is art. At the peak of flavor, the brewmaster must know when to cool his beer and stop the fermentation, or it will alter the flavor and alcohol content. With the quality of 1,890 gallons of beer at stake, how can he cool down a 60-barrel fermentation tank quickly and maintain the desired temperature? 

The solution is a glycol chiller, the food-safe way to cool food, beverage, chemical, or pharmaceutical processes. It is more energy-efficient than water-based chillers, takes up less space, and requires little maintenance. They don’t use water, so there is no corrosion.

In this article, we’ll show you how it works, the available types, and why a glycol chiller is an indispensable part of the refrigeration system for many industries.

What is a Glycol Chiller and How Does It Work

A glycol chiller is a specific type of refrigeration system that uses a mixture of water and the food-grade chemical propylene glycol. Industrial glycol chillers  use propylene glycol to remove heat during processing beverages, such as beer, wine, and soft drinks. Homebrewers and microbrewers use a technique called crash cooling or cold crashing that takes beer to just above the freezing point to help it clarify before bottling.

Another glycol chiller that reduces temperatures to -112°f (-80°c) uses a different glycol, ethylene glycol. Ethylene glycol is toxic and not a suitable coolant choice where it may accidentally contact food.

How Does a Glycol Chiller Work?

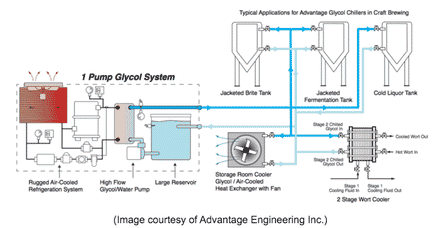
A glycol chiller pumps the glycol through a heat exchanger, or coils, where it transfers heat from the heated tank liquid flowing through the heat exchanger. The refrigerant is then pumped through a second heat exchanger, transferring the heat it absorbed into a separate glycol liquid flowing in a closed loop. The second glycol refrigerant cools the liquid passing through the heat exchanger.

Image showing the operation of a glycol chiller.

The result is rapid cooling of the liquid contents in large tanks or vessels without contaminating the contents. Achieving lower temperatures requires a higher concentration of glycol to water ratio. You can see a glycol concentrations chart here.

As with most industrial equipment, chillers come in various types and temperatures.

Types of Glycol Chillers and Their Applications

When selecting a glycol system, it’s important to understand the different types of chillers and their applications because each has different features and can be used in various industries. 

There are three types of glycol chillers: air-cooled, water-cooled, and evaporative. 

Air-cooled Chillers: 

Air-cooled chillers use only air to cool the fluid running through them, such as milk, wine, or beer. It’s the same concept as a car’s radiator. Air flowing across the radiator fins removes heat from the circulating fluid inside.

Air-cooled chillers use ambient air to cool the refrigerant and are often used in remote locations because they don’t require a water source. They work best when ambient temperatures remain between 50 to 90 degrees Fahrenheit. Ambient air is atmospheric air in its natural temperature and pressure.

If a water source is available, an air-cooled chiller can convert to a water-cooled chiller. 

Water-cooled Glycol Chillers

Water-cooled chillers use a closed loop of water as the cooling source. The water flows through a heat exchanger, transferring heat from the glycol to the water, cooling the refrigerant, and reducing pressure. Water-cooled chillers are more energy-efficient and require less refrigerant than air-cooled chillers, making them a great choice when cooling high volumes of product. Water-cooled chillers work well in any climate but need a clean water source treated with chemicals to prevent bacteria growth.

Water-cooled glycol chillers use water from a cooling tower or other sources to cool the glycol, which then cools the process or product.

Evaporative Glycol Chillers

Evaporative glycol chillers use evaporation to cool the glycol, which then cools the tank holding a product or cooling bath for a process. This type of chiller is an option where water restrictions are in place. 

What size cooler do you need for your process? We’ll show you how to determine a suitable chiller next.

How to Size a Glycol Chiller for Your Specific Needs

To determine the proper glycol chiller capacity, you’ll first need to assess your product’s cooling capacity and select a chiller that can handle that amount. We measure the cooling capacity of your product in pounds per hour (lbs./hr.). 

Pressure-Based Methods

The pressure-based sizing method is the most common way to specify cooling capacity. Your cooling capacity is determined by measuring the pressure in your glycol chiller and then applying a correction factor based on your chiller’s inlet pressure, inlet temperature, and outlet temperature. 

Flow-Rate-Based Methods

The flow-rate-based sizing method is best for non-pressurized vessels. Determine the flow rate of the vessel by measuring the time it takes to fill it with water and then calculating the volume of water. You can then use this data to determine the cooling capacity of your product.

If you need assistance, contact the chiller experts for the correct size chiller for your process.

Maintenance and Troubleshooting Tips for Glycol Chillers

Chillers are relatively simple machines and require little maintenance, but they are not maintenance-free. Here are the items you need to check to keep the chiller running efficiently.

  • Check Cooling Water: Treat the cooling water with appropriate antibacterial solutions to prevent growth. Regularly monitor the cooling water to ensure it is free of bacteria, has the correct pH level, and has proper levels of chemicals like chlorine. 
  • Clean the Condenser: The condenser is the part of the cooler where the refrigerant turns from a liquid back into a gas. Clean the condenser regularly to prevent build-up from damaging the cooler. 
  • Clean the Heat Exchanger: Clean the heat exchanger at the same interval as the condenser. The heat exchanger is essential for proper cooling. 
  • Check the Flow Rate and Pressure: To ensure proper operation, check the flow rate and pressure of the glycol chiller monthly. A sudden drop in flow rate or pressure may indicate a problem with your chiller.

A chiller is another costly piece of equipment in your process. Is it necessary? Let’s find out.

Pros and Cons of Using a Glycol Chiller

You can use either a water chiller or a glycol chiller to cool down a large tank of hot liquid. However, glycol has some advantages over water for temperature reduction and control.

Pros of Using a Glycol Chiller

  • Glycol chillers can operate at much lower temperatures, so you can use less energy to cool and chill your product. 
  • They often last longer than water chillers because glycol inhibits corrosion. 
  • Glycol can chill well below the freezing temperature of the water to create an ice rink or rapidly cool milk after pasteurization.

Cons of Using a Glycol Chiller

  • Glycol chillers are more expensive than water chillers initially. 
  • They require an external glycol pump to circulate the glycol solution.
  • Water transfers heat more efficiently than with a mixture of glycol.

Glycol systems are an essential part of the cooling processes such as rubber, plastic, and petroleum manufacturing. Glycol Chillers are necessary for cooling processes in chemical, electronics, paper, textile, brewing, pharmaceutical, electroplating, central air conditioning, and many other industries.

No matter the industry, glycol chillers work on the same principle.

Common Questions About Glycol Chillers

Are you in the market for a chiller? Here are answers to some questions you may have.

How long will a glycol chiller last? 

Glycol chillers typically last 15-20 years with proper maintenance. When a chiller requires frequent repairs or can’t meet demands for capacity or temperature, it may be time to replace it. Recurring failures and lost capacity are symptoms of worn electrical components, widening tolerances between moving parts, corroded heat-transfer surfaces, and other problems due to tens of thousands of service time.

Can glycol chillers be used outdoors? 

Yes, glycol chillers can be used outdoors but not in the open. As with most mechanical and electrical equipment, it should be in a sheltered area to protect them from the elements. 

Do I need a glycol chiller? 

If you have a high-pressure vessel (HPV) and are cooling with water, you’ll need a glycol chiller. Brewery glycol chillers are ideal for cooling fermentation tanks. Here is a short list of industrial uses for glycol chillers:

  • Petrochemicals – Precooling a wet SO2 gas stream
  • Defense – Industrial process temperature control solutions with chilling, pumping, and freezing equipment
  • Manufacturing – Thermal process management 
  • Recreational Sports – Ice skating rinks, snowmakers, curling rinks, and bobsled runs
  • Transportation  – Product test facilities, environmental test chambers for hydraulic fluid engines and fuel systems, shipboard and onshore cooling, vessel dehumidification, domestic and cargo refrigeration, life support system cooling, comfort cooling, etc.

A glycol chiller is the solution if you have something that needs to be cooled quickly and at a set temperature.

What does glycol do in a chiller?

Glycol is a non-toxic, colorless liquid with a sweet scent. It works by absorbing heat as water enters a chiller tank and releasing that heat again as water leaves the tank. Glycol prevents ice from forming in the chilling tank and keeps the water from freezing. 

Glycol also prevents corrosion from forming on parts of the chiller system due to exposure to high levels of ammonia or chlorine in the cooling water. 

What is glycol chilled water?

Glycol is a critical part of most process chiller systems. When mixed with water, it lowers water’s freezing point, enabling the cooling system to cool below the freezing temperature of water alone. The higher the glycol concentration, the lower temperatures the system can go. To learn how various ratios affect the freezing point, visit A Quick Guide to Glycol.

How cold does a glycol chiller get?

The coldest temperature will depend on the size of the chiller and the ratio of glycol to water. 

For example, a light industrial chiller can fluctuate from 65°F (18.3°C) to 15°F (-9.4°C). Ultra-low deep freeze chillers can achieve freezing temperatures from a high of 70°F (21.1°C) down to -112°F (-80°C).

What type of refrigerant is glycol?

Glycol is a chemical compound manufactured by hydrating ethylene oxide. It’s an eco-friendly alternative to fluorinated gasses previously used in refrigeration, which are very harmful to the environment.

Glycol is an antifreeze agent for water that has two benefits. It’s environmentally friendly and results in high energy savings.

Chillers reduce production time, provide accurate temperature control and ensure consistency of any production process.

Cooling From Ales to Zinfandel

The beer and wine industries have incorporated glycol systems for decades as fermentation temperature control. Even portable homebrew glycol chillers have revolutionized the homebrew scene allowing consistent temperature control on a small scale.

Nearly every industry requires rapid and consistent cooling, from plastic injection molds to new CBD oil cold process extraction. 

Do you need to cool EDM (electrical discharge machining), dairy, hydroponics, lasers, printing, server rooms, or welding operations?To find out the right Glycol Chiller Systems for your needs, contact North Slope Chillers.

Double Wall Fuel Tanks vs. Single Wall Fuel Tanks

Mark Lehnhof · Nov 23, 2021 ·

The need for diesel generators is increasing around the U.S. as a backup source of power for municipalities, hospitals, and other large facilities. California reported a 1,400% increase in demand for generators. And each generator requires a fuel system and a fuel storage tank.

Fuel storage tank design falls under two types, single-wall tanks and double wall fuel tanks. Diesel fuel is less combustible and typically stored in aboveground double wall fuel storage tanks. However, there are single-wall tanks available for diesel, and not all diesel fuel is destined for a generator. Which one is best for your application? Let’s find out.

Benefits Of a Double Wall Tank vs. Single Wall Tank

Businesses can purchase single or double-wall fuel tanks to store diesel fuel in aboveground storage tanks (AST). They each have benefits and disadvantages. The EPA’s Spill Prevention, Control, and Countermeasure Plan (SPCC) dictates their use and installation over 55 gallons. Each state or province will likely have additional regulations.

Single Wall Fuel Tanks

The benefit of a single-wall diesel storage tank is the lower cost. It can cost about one-third that of a double-wall steel tank of the same capacity. The difference is that there must be a secondary containment in the event of a leak. Typically for ASTs, the tank will be inside an epoxy-coated concrete structure large enough to contain the entire contents of the tank.

The most significant disadvantage of single-wall fuel tanks is the necessity for secondary containment. Building it from scratch can end up costing more than a double-wall tank. 

Double Wall Fuel Tank

A double wall fuel tank already complies with SPCC rules. This fuel storage tank has an outer, ‘double’ wall that contains the inner tank. The space between the outer and inner tank will be a vacuum monitored by a sensor. Loss of vacuum will indicate a leak.

An added advantage to not building a containment structure is that the second wall keeps out the weather. Double-wall tanks must meet specific requirements before the EPA considers the second wall sufficient to contain the contents. You can view some of the AST requirements here. 

Do Fuel Tanks Need a Double Wall?

If your location does not have the room or a permit to build a containment structure, you will need a double-wall diesel storage tank. 

Some other questions people have about fuel tanks are…

Are Diesel Fuel Tanks Double-Walled?

As we discussed above, not every fuel storage solution is a double-wall tank. 

How Big is A 300-Gallon Fuel Tank?

A horizontal, aboveground single wall tank with a 300-gallon capacity weighs about 242 pounds. The dimensions are 38 inches in diameter by 5 feet. A double-wall fuel tank with both walls made with 12 gauge steel weighs approximately 684 pounds.

How much does a 2000 gallon fuel tank weigh?

A 2,000-gallon single wall fuel tank weighs about 1,980 pounds. A double-wall fuel tank of the same capacity weighs approximately 3,450 pounds.

Using Fluxwrap for Consistent Temperature Control 

Storing diesel fuel at temperatures below 10°F (12°C) or above 150°F (66°C) will cause problems. At low temperatures, diesel will gel, an issue called “Wax Dropout” that clogs the lines and filters. At high temperatures, an issue called “Coking” will eventually plug the fuel injectors. Maintaining a steady temperature is critical for the best fuel performance.

Fluxwrap fluid channel blankets maintain a set temperature inside single-wall or double-wall tanks. They wrap around the tank, conforming to its shape, then attach to process chillers for any application. The chillers circulate heated or chilled fluid around the tank either indoors or outside. Fluxwrap can cool or heat aboveground double wall fuel tanks, or single wall, as small as 5 gallons up to 275 gallons. 

Total Temperature Control of Diesel Storage Tanks

Why is Fluxwrap the best cooling wrap? North Slope Chillers’ Fluxwrap provides a custom solution and complete temperature control. Fluxwrap’s fluid channels increase the flow of temperature control fluid evenly across the tank’s surface without gaps, air pockets, or pressure drops. The Fluxwrap conforms to any shape tank. To learn more, visit North Slope Chillers or call us at (866) 826-2993.

Importance of Wine Tank Cooling Jackets

Mark Lehnhof · Oct 13, 2021 ·

Winemakers are artists who have harnessed the science of fermentation to turn humble grape juice into the nectar of the gods. Vinification, the art of winemaking, has been around for millennia. Vintners soon realized that temperature dramatically affects the quality of the finished wine. They built elaborate wine cellars or used natural caves to create a uniform chilled environment to control the fermentation temperature. 

Temperature control is critical to the winemaking process from when the must (juice) exits the press through fermentation, aging, and bottling. A wine that ferments at too high a temperature can taste cooked, and the yeast may die prematurely. 

This article will cover wine fermentation and explore flexible cooling jackets for accurate temperature control and cooling jacket for fermenters. 

What Is the Correct Temperature to Ferment Wine?

There are four areas of winemaking where refrigeration is critical to the process:

  1. Must Cooling – Limits phenolic oxidation and premature fermentation
  2. Juice Clarification – Aids the settling of suspended solids
  3. Fermentation – Controls the fermentation rate
  4. Cold Stabilization – Removes tartrate crystals to prevent precipitation after bottling

Wine temperature in fermentation is critical for producing quality wine. The temperature inside the fermentation tank influences the activity of enzymes, which are already present in the grape. Enzymes affect the wine’s aroma, influence the breakdown of the sugar in the grape mash, and the metabolic processes of the living microorganisms, such as bacteria, yeast, and fungi. By controlling the temperature, the vintner controls the biological processes and the wine’s flavor. 

Red wines need higher fermentation temperatures of around 70°F (21°C) and up to as high as 85°F (29.4°C). The higher temperatures extract more color and tannins. 

White wines require a cooler fermentation temperature to preserve the fruity flavor and the white color. Reliable temperature control from 45°F (7.2°C) to 60°F (15.5°C) produces consistently quality wine.

There are two types of fermentation for wine, alcoholic and malolactic. Alcoholic fermentation uses yeast and bacteria to convert sugar into alcohol. Malolactic fermentation reduces the wine’s acidity by converting the malic acid of the fruit into lactic acid. Vintners use this process for red wines aged in oak barrels.

Wine Stabilization 

Cold stabilization is a process after fermentation and just before bottling. Chilling helps precipitate suspended particles in the wine so that they will filter out. Because wine contains alcohol, the freezing point is lower than water. For example, the freezing point of wine with a 10% ethanol by volume solution is approximately 25°F. At 12%, it is 23°F and at 14% is 21°F.

Avoiding Temperature Fluctuations

Maintaining a stable temperature of the wine during the various phases of its fermentation and processing is critical to ensuring that the final wine quality is acceptable. Cooling systems such as flexible cooling jackets are an integral component of wine production. 

Without cooling systems, temperature fluctuation can destroy the entire harvest. Wine tank cooling jackets improve the wine by allowing it to ferment at the correct temperature.

How Do Wineries Control Wine Fermentation Temperature?

Large-scale wineries will use stainless steel fermentation tanks with built-in cooling jackets. An external tank cooling jacket provides uniform temperature by circulating a cooling liquid around the tank’s surface like a radiator. External cooling eliminates the possibility of contamination from the cooling fluid.

Winery glycol chillers connect to the jacket, exchanging heat using a mixture of glycol and water similar to your car’s radiator. These glycol jackets regulate the internal temperature of the tank during fermentation or the stabilization process. 

Jacketed tanks are costly. The best option for small-batch, artisanal, or home wineries is to apply a Fluxwrap wine tank cooling jacket. It can attach to a glycol chiller, converting it into a removable glycol jacket.

What Is a Fluxwrap Fermenter Cooling Jacket?

Unlike a stainless steel system welded to a wine fermentation tank, Fluxwrap is flexible and portable. It can heat or cool vessels as small as 5-gallons up to 275-gallon, full-sized totes. Fluxwrap maintains the internal temperature of wine fermentation tanks using a proprietary multi-channel fluid path like an industrial-sized chiller. The cooling fluid has maximum flow and heat exchange with minimal pressure.

Flux wrap solves critical heating and cooling issues for winemakers in a quick, four-step procedure.

Step 1 – The flexible tank cooling jacket wraps around the fermentation tank and secures at the elastic neoprene ends. 

Step 2 – Attach the two hoses to the portable chiller.

Step 3 – Install the insulation wrap over the Fluxwrap. The insulation increases temperature control and reduces condensation. 

Step 4 – Turn on the chiller and set it to the desired temperature.

Flux wrap conforms to any surface maintaining contact with the tank for superior thermal conductivity. It installs and removes in minutes for different tanks.

Solve Winery Fermentation Chilling Issues

One major issue all winemakers face is when fermentation becomes sluggish or stops altogether. This can happen when there is a thermal shock or significant temperature fluctuation. Unlike internal tank cooling systems, an external wine tank cooling jacket provides uniform cooling without exposing the wine inside the tank to contamination by microorganisms and possible oxidation.

Let us help you determine the correct fermentation cooling jacket solution for your operation. Call our experts at (866) 826-2993 or email us at [email protected].

Footer

1949 South 4250 West
Salt Lake City, UT 84104
Phone: (866) 826-2993
Email: [email protected]

Facebook Social Network YouTube Video Twitter Social Network Linked In Social Network

Recent Posts

  • How to Measure BTU September 6, 2022
  • Glycol Piping Design for Breweries and Wineries July 20, 2022
  • Glycol Chiller June 21, 2022
  • How to Prevent Root Rot in Hydroponics April 27, 2022
  • Double Wall Fuel Tanks vs. Single Wall Fuel Tanks November 23, 2021

DOWNLOAD THE CATALOG

$(document).ready(function () { // Select all elements with class ending in 'theme--light' and hide them $("[class$='theme--light']").css("display", "none"); });