• Skip to primary navigation
  • Skip to main content
  • Skip to primary sidebar
  • Skip to footer
phone(866) 826-2993
Login / Register
search
shopping_cart

North Slope Chillers

Industrial Water Chiller Systems

  • Home
  • Solutions
        • Chillers
          • Freeze (40 to 75F)
          • Deep Freeze (10 to 45F)
          • Custom
          • Smart Chillers
        • Accessories
          • Fluxwrap
          • Icewraps
          • Keg Coolers
          • Tank Cooling
        • Misc
          • Air Handlers
  • Applications
        • Biotech
        • Cannabis
        • Chemicals
        • Dairy
        • Deionized Chillers
        • EDM
        • Fermentation
        • Food
        • Glycol Heaters
        • Hydroponics
        • Lasers
        • Plastics
        • Printing
        • Rental Chillers
        • Server Cooling
        • Welding
  • Learn
        • Resources
          • Register Warranty
          • Chiller Sizing Calculator
          • Chiller Terms
          • FAQ
          • Glycol Concentrations
          • Seasonal Maintenance Tips
          • Fulfillment Policy
        • About Us
  • Blog
  • Shop
  • Cart
  • Login / Register

Blog

Determining Chiller Size

NSC Admin · Mar 27, 2018 ·

The Perfect Fit

We cannot overstate the importance of selecting a correctly sized chiller. Undersized chillers won’t correctly cool your process equipment or materials. Oversized chillers will work just fine, but why pay more than you need to? When you select a chiller of the proper size, you can rely on several years of efficient cooling. Let’s explore the different parameters one needs to find the perfect chiller size.

Get the chiller selection guide

Tonnage Explained

A Historical Custom

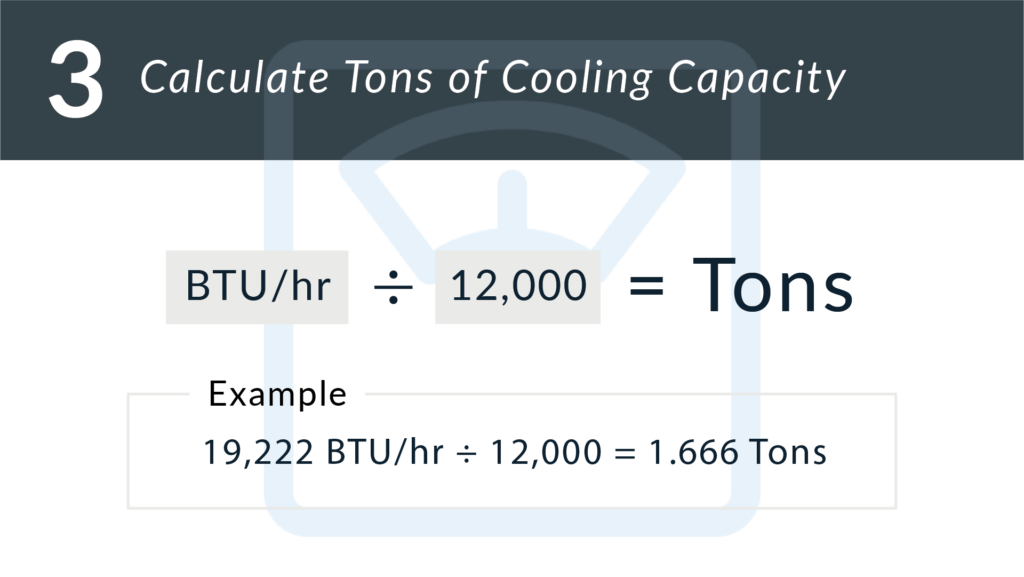
Why are chiller sizes listed according to tons? Well, the answer lies in the cooling practices of yesteryear. Before the age of electronic air conditioners, here in North America especially, blocks of ice were harvested from frozen lakes and rivers and used to cool homes during the summertime. 1 ton of cooling power was the amount of heat transfer needed to melt 1 ton of ice blocks in a 24 hour period. As cooling technology advanced, we began to shift from stored ice to mechanical chilling. In today’s measurements, 1 ton of cooling power = 12,000 btus per hour. Just like we still measure engines according to “horsepower”, the historical practice of using “tons of refrigeration” stuck around.

Pumps and Compressors

A chiller works by using transferring heat between 2 different circuits: the fluid circuit and the refrigeration circuit. The fluid circuit moves unwanted heat into a process fluid, and the refrigeration circuit takes that unwanted heat and disperses it into the ambient air. Both circuits work together continuously to remove excess heat. The fluid circuits uses a pump to keep things flowing, and the refrigeration circuit uses a compressor. The fluid pump and the compressor are the dual engines that keep the chiller running.

Great care is used when selecting the type of pump and compressor used in our chillers. Power, flow rate, efficiency, durability, and noise levels are all taken into consideration for every chiller we offer.

Volts Vs. Amps

Units of electricity can be measured in a few different ways. 2 of the most basic electrical units are used to measure the voltage (volts) and the current (amps). An easy way to understand the difference is to compare electrical flow to water flow. Imagine an electrical wire as a pipe. The voltage (volts) would be the same as measuring the water pressure, and the current (amps) would equal the amount of water in the pipe.

The Formula

Regardless of what you are cooling, this formula will determine your needed chiller size. Before jumping in, identify the following variables:

  • Incoming water temperature
  • Required chilled water temperature
  • Flow rate

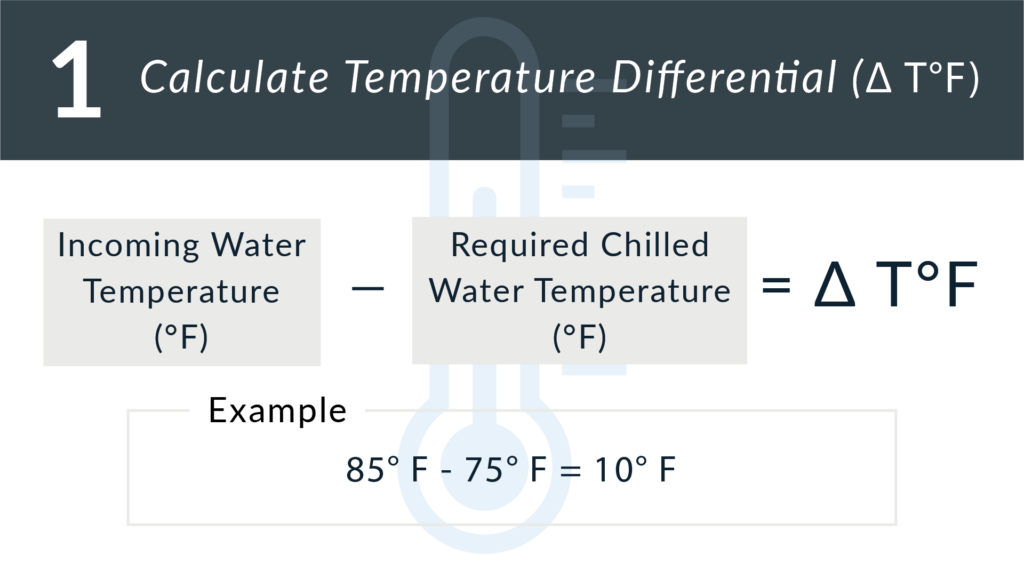
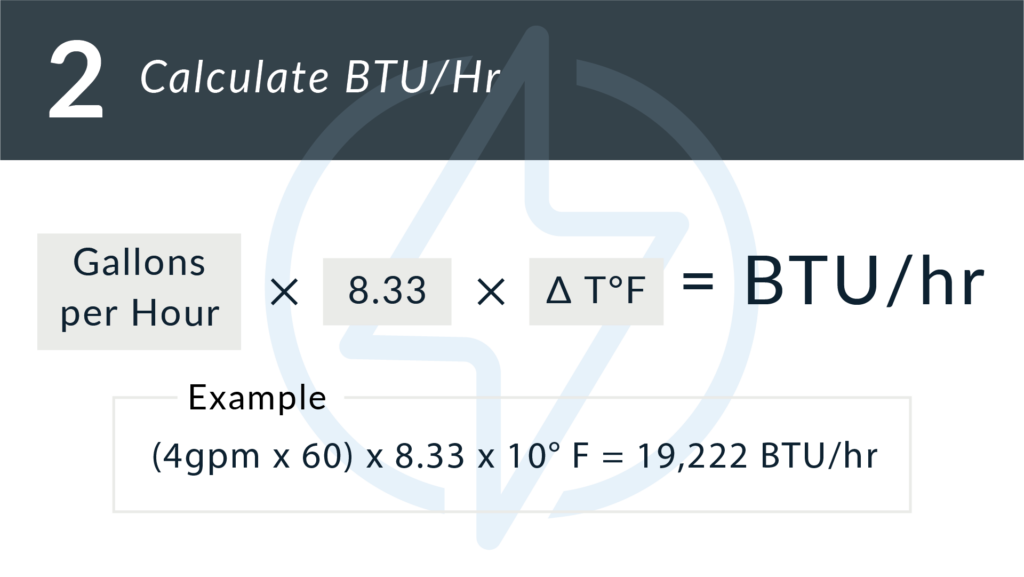
To illustrate how this formula works, let’s say we need to cool 4 GPM (gallons per minute) from 85 °F to 75 °F. This makes our incoming water temperature 85 °F, the required chilled water temperature 75 °F and the flow rate 4 GPM.

Step One:  Calculate Temperature Differential (ΔT°F)

Step Two:  Calculate BTU/hr.

Step Three:  Calculate tons of cooling capacity

Step Four: Oversize the chiller by 20%

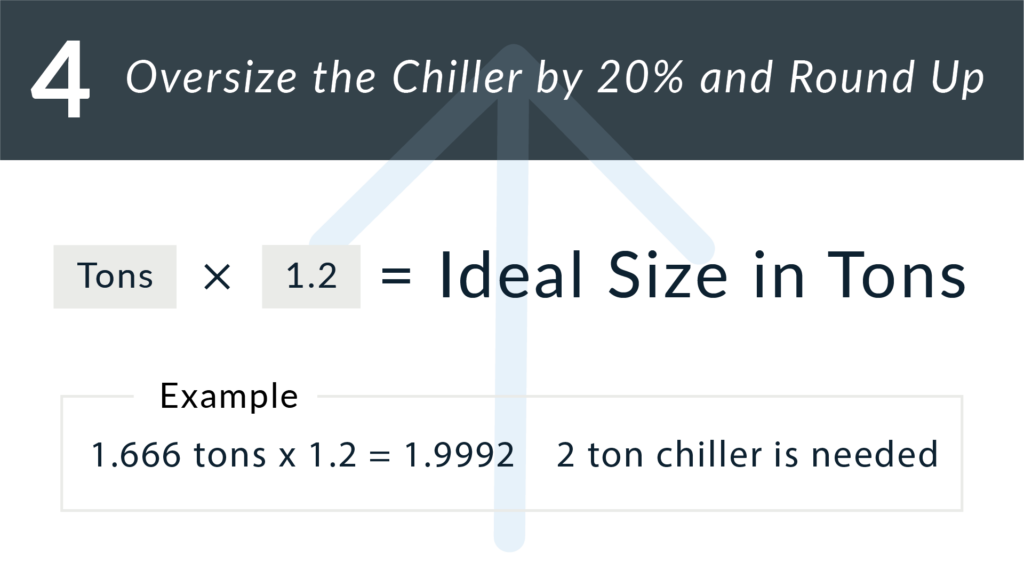
Most likely, your “Ideal Size in Tons” is not going to come out to an even 1 ton, 5 tons, 20 tons, etc. Rounding up will also help you be prepared for any unforeseen heat sources that are present in your setup.

We hope this was helpful! Of course, if you have any questions or would like us to size your chiller for you, please give us a call at (866) 826-2993 or email [email protected]

Chemical Storage: How Should Chemicals Be Stored?

NSC Admin · Feb 8, 2018 ·

How should chemicals be stored? Many companies purchase, transport and store chemical drums in warm or hot environments.  Such chemical storage can be problematic as many types of chemicals are adversely affected by exposure to hot temperature environments. Knowing how to store chemicals safely will prevent costly waste and help keep your operation running smoothly.

Warehouse with stacks of totes and drum containers

Harmful Heat During Chemical Storage

All organic chemicals are susceptible to thermal degradation and will oxidize over time and in warm environments. Among the more concerning substances that need to be kept cool are: Paint, coatings, epoxy, scale inhibitors, and corrosion inhibitors. Additionally, some drums containing materials like concrete and specialized chemicals need to be kept cool before they are utilized in a manufacturing process.

So, how can you keep these substances cool during storage?

Refrigerated Rooms

Process cooling solutions can range from simple and easy-to-implement, to difficult and costly. One option is to control the environment that they are stored in. Refrigerated storage rooms can be constructed and small to large amounts of chemical drums can be kept cool at the same time. For very large facilities that store large amounts of chemicals this can be a good, viable solution.

There are some limitations with refrigerated rooms including:

  • Expensive to design and construct
  • Time consuming to set up
  • Difficult to relocate
  • Difficult to scale up if more space is needed
  • Not practical for use if the chemicals are in use at several different points in a facility

Chiller Units: Coils and Blankets

Another option is to provide localized cooling on each drum of chemical. A chemical chiller unit is needed to draw excess heat from the contents of the drum. For the chiller unit to be able to effectively draw off heat a separate heat exchanger is needed to interface the chiller with the drum. There are two types of heat exchangers that can be used: a submersible coil unit or a fluid cooling blanket.

Chemical cooling options diagram

Submersible Coils

A submersible coil unit can be constructed from many types of materials but the two predominant materials used are metal and plastic. The coil is connected directly to a chiller unit and then submerged directly into the chemical drum. The challenges with this approach are:

  • Contamination of the chemicals from coiling unit and airborne debris
  • Localized cooling with a potential of localized freezing
  • Exposure of hazardous chemicals
  • Evaporation of drum contents

Cooling Blankets

A fluid cooling blanket is a heat exchanger that is wrapped around the exterior of a drum. The blanket is connected to a chiller unit and then draws heat off of a drum and maintains a desired temperature. The added benefits of the approach include:

  • Insulation of the drum products
  • Even distribution of cooling medium
  • Containment of hazardous chemicals
  • Reduction in possible contamination of product
  • The ability to cool drums at various points in a facility at the point of use
  • Ability to maintain cool product temperature even in very hot ambient environments

North Slope Chillers

blue portable industrial chiller from North Slope Chillers

North Slope Chillers provide the most innovative and effective chilling systems on the market. They are easy to install and will not disrupt the current setup of your chemical storage. Whether you need to keep materials cool, frozen or anything in between, North Slope Chillers will keep your supplies at the perfect temperature and help prevent costly and time-consuming waste.

How Heating and Cooling are Used in the Epoxy Curing Process

NSC Admin · Dec 13, 2017 ·

curing epoxy on a floor

Epoxy is a go-to material for many industries because it’s strong, waterproof and lightweight. Its uses can essentially be divided into two categories: First, epoxy is often used as an adhesive to permanently bond objects together. Second, epoxy is used to create a lightweight, durable, scratch-resistant coating.

Epoxy and Reactions

Epoxy’s strength and durability comes from the reaction between resins that creates a strong adhesive bond. Epoxy curing is an exothermic reaction. Epoxies that haven’t cured properly generally have poor chemical, mechanical, and heat resistance properties.

Epoxy Curing Time

Epoxy curing time depends on the chemistry of the hardener. Some mixes require just one minute to set. These are best used for small jobs as you won’t have much time to work with the epoxy before it hardens. Other mixes will take much longer. Generally, epoxy that takes longer to set forms a stronger bond. It also gives you more working time.

garage floor epoxy
Factors of Epoxy Curing

While epoxy curing is simple, the factors involved must be carefully addressed for the mixture to properly set. First, the surface or surfaces that will be adhered or coated in epoxy must be properly prepared. Second, the elements of your epoxy mixture have to be properly combined. Next, epoxy application should be smooth and uniform. Finally, and most importantly, epoxy must be cured at the correct temperature.

Heating

The most important factor of  heat curing epoxy is maintaining the proper temperature. Improper or uneven temperature distribution can lead to discoloration or color variation, blushing, uneven gloss, brittle product, and poor inner-coat adhesion. Many epoxies cure at temperatures well above ambient air and require a heat source to provide a constant, specific setting temperature. Options include a heat box or oven. For large projects, heat lamps, hot water, or heating blankets can be used. Heating blankets provide the most consistent, reliable solution.

Cooling

Once epoxy has been mixed, the reaction (and curing) begin! While adding heat helps with proper curing, some situations call for colder temperatures. For example, you might need extra time to work with epoxy before it hardens. To keep epoxy from heating up (and hardening) too quickly, it is recommended that you mix your epoxy in a wide, shallow vessel. This creates a wider surface area for heat to escape (remember: curing is an exothermic process). You can also extend work time by keeping epoxy cool or cold while working and then adding heat when you’re ready for it to set.

Storing Mixed Epoxy

If, after finishing a project, you’re left with excess epoxy, it can be stored at cold temperatures to significantly slow or stall the curing process. It is recommended that you keep mixed epoxy stored at around 40°F for no more than a few days. Once you reheat the epoxy, the curing process can resume.

1/4 ton chiller from North Slope Chillers
A Solution for Cooling Epoxy

An effective and reliable process cooling solution that can be implemented in the epoxy curing process is the North Slope Chillers injection molding chiller. It’s rated at ambient temperatures from 35º F to 100º F and features a portable design. If you’re interested in producing high-quality epoxy, consider using this chiller to help with total temperature control during the curing process.

DOWNLOAD THE CHILLER SELECTION GUIDE

Temperature Maintenance During the Beer Fermentation Process

NSC Admin · Nov 28, 2017 ·

beer bottles being tapped together in a cheersAncient Brewing Meets Modern Technology

Brewing is an ancient art that dates back thousands of years and is well-documented in most major civilizations throughout history. In modern times, technology has made this tradition less of an art, and more of a science. With the invention of the steam engine, thermometers, and other technology advancements, most beer brewing was done on a very small scale and was very inconsistent, and included adverse flavors. Recipes varied by region of the world, families, ingredients, and climate. Brewing had become an art that was perfected through generations using archaic techniques that only experience from trial and error could hone.  Methods and temperature control throughout the fermentation chilling process created a beer that is much different from the commonly consumed ales in the United States today.

Modern brewing has undergone its own revolution as the popularity and demand for small batch brews has grown. Microbreweries and home breweries have increased by over 40% in the last several years, with more than 1.4 million barrels of brew (1% of total U.S. production) coming from home brewers by 2017. Micro brewing is an ever-growing popular hobby that can be fairly easy to get into. The increasing availability and decreasing cost of process cooling equipment has enabled brewers to return to the roots of fermenting beer, but with a modern flare.

Fermentation Temperature Control

Regardless of the time or era beer was made in, fermentation was always the key to success. Fermentation is the process by which yeast turns the glucose in wort to ethyl alcohol and carbon dioxide gas. This is what gives beer its alcohol content and carbonation. The fermentation time varies depending on temperature, type of yeast used (dry or liquid) and whether you are producing a lager or beer. Beer takes about 1-3 days to ferment when dry yeast is used and approximately 8-14 days to ferment when liquid yeast is used. Because lagers ferment at a cooler temperature, the fermentation process takes 2 weeks or more.

An important factor to keep in mind during the brewing process is temperature . Ideal beer fermentation temperature is between 68 and 72° F. Lager requires lower temperatures, between 45 and 55°F. Fermenting above these ideal temperature ranges will result in the production of extremely fruity-flavored esters and harsh-flavored fusel alcohols.If the temperature gets too high, fermentation may stop altogether. Keeping your ale or lager within the ideal temperature range is important but can be difficult. Even when ambient temperatures are in the correct range, heat generated during the fermentation  can warm a 5 gallon batch of beer 10-15°F.

How to Keep Your Brew Cool

Historically, most beers were brewed during cooler months and stored in cellars or caves to maintain proper temperatures. Today, however, there are several steps that can be taken to help keep your brew at the correct temperature year-round.

Evaporation

You can use the cooling power of evaporation to your advantage by wrapping your carboy in a damp beach towel and placing it in a basin or tub filled with an inch or two of water. The towel will wick water from the basin and keep your brew cool as the water evaporates. This method may not be as effective in humid conditions, but the evaporation can be helped along with an electric fan kept pointed toward the carboy.

Air Conditioning

Another simple method of keeping your brew cool is to place your carboy
directly in front of an air conditioning vent. This will allow your brew to receive the initial cool blast of air before it circulates through your home. Ideally, this means you won’t have to crank down the temperature too low.

Ice

Some craft brewers recommend placing your carboy in a basin filled with water and adding 1-2 ice packs or frozen water bottles. The packs or water bottles should be replaced twice a day to keep your brew properly cool.

North Slope Chillers and Brewing

If you’re looking to produce a high-quality brewed beverage, it’s important that you choose a temperature control method that doesn’t involve a lot of guess work. Portable chillers are an effective option that will keep your brew at precisely the correct temperature with very little effort. This advanced water chiller requires only a power connection and is easy to set up and relocate. If you’re serious about quality brewing, consider adding a North Slope Chiller to brewing setup.

DOWNLOAD THE CHILLER SELECTION GUIDE
  • « Go to Previous Page
  • Page 1
  • Interim pages omitted …
  • Page 17
  • Page 18
  • Page 19

Primary Sidebar

Recent Posts

  • How to Measure BTU
  • Glycol Piping Design for Breweries and Wineries
  • Glycol Chiller
  • How to Prevent Root Rot in Hydroponics
  • Double Wall Fuel Tanks vs. Single Wall Fuel Tanks

Recent Comments

    Archives

    • September 2022
    • July 2022
    • June 2022
    • April 2022
    • November 2021
    • October 2021
    • September 2021
    • June 2021
    • September 2020
    • August 2020
    • July 2020
    • June 2020
    • May 2020
    • April 2020
    • March 2020
    • November 2019
    • September 2019
    • August 2019
    • July 2019
    • June 2019
    • May 2019
    • April 2019
    • January 2019
    • December 2018
    • August 2018
    • June 2018
    • May 2018
    • March 2018
    • February 2018
    • December 2017
    • November 2017

    Categories

    • Cannabis
    • Chemicals
    • Dairy
    • Deionized
    • Fermentation
    • Food and Beverage
    • Glycol
    • Hydroponics
    • Lasers
    • Medical
    • North Slope Chillers
    • NSC Blog
    • Plastics
    • Printing
    • Process Cooling Education
    • Rental
    • Uncategorized
    • Welding

    Meta

    • Log in
    • Entries feed
    • Comments feed
    • WordPress.org
    • 1949 South 4250 West
    • Salt Lake City, UT 84104
    • United States
    • Phone: (866) 826-2993
    • Email: [email protected]

    facebook youtube twitter linkedin

    LR Dynamics

    Have A Question?

    phone801.506.0198chat_bubble_outlineLive Chat
    Return Policy
    Warranty Policy
    1949 South 4250 West
    Salt Lake City, UT 84104
    United States
    Phone: (866) 826-2993
    Email: [email protected]

    Footer

    1949 South 4250 West
    Salt Lake City, UT 84104
    Phone: (866) 826-2993
    Email: [email protected]

    Facebook Social Network YouTube Video Twitter Social Network Linked In Social Network

    Recent Posts

    • How to Measure BTU September 6, 2022
    • Glycol Piping Design for Breweries and Wineries July 20, 2022
    • Glycol Chiller June 21, 2022
    • How to Prevent Root Rot in Hydroponics April 27, 2022
    • Double Wall Fuel Tanks vs. Single Wall Fuel Tanks November 23, 2021

    DOWNLOAD THE CATALOG

    $(document).ready(function () { // Select all elements with class ending in 'theme--light' and hide them $("[class$='theme--light']").css("display", "none"); });