• Skip to primary navigation
  • Skip to main content
  • Skip to primary sidebar
  • Skip to footer
phone(866) 826-2993
Login / Register
search
shopping_cart

North Slope Chillers

Industrial Water Chiller Systems

  • Home
  • Solutions
        • Chillers
          • Freeze (40 to 75F)
          • Deep Freeze (10 to 45F)
          • Custom
          • Smart Chillers
        • Accessories
          • Fluxwrap
          • Icewraps
          • Keg Coolers
          • Tank Cooling
        • Misc
          • Air Handlers
  • Applications
        • Biotech
        • Cannabis
        • Chemicals
        • Dairy
        • Deionized Chillers
        • EDM
        • Fermentation
        • Food
        • Glycol Heaters
        • Hydroponics
        • Lasers
        • Plastics
        • Printing
        • Rental Chillers
        • Server Cooling
        • Welding
  • Learn
        • Resources
          • Register Warranty
          • Chiller Sizing Calculator
          • Chiller Terms
          • FAQ
          • Glycol Concentrations
          • Seasonal Maintenance Tips
          • Fulfillment Policy
        • About Us
  • Blog
  • Shop
  • Cart
  • Login / Register

Blog

Heat Exchangers in Process Cooling

Brooke Loeffler · Aug 19, 2020 ·

What Are Heat Exchangers?

A heat exchanger is a system that transfers heat between substances, through the movement of a cooling medium (fluid or air). They are used for both heating and cooling in a wide range of industrial applications: power stations, computer processors, chemical plants, food and beverage processing, refineries, refrigeration, space heating/cooling, combustion engines, and more.

Learn more about How Chillers Work
Close up of a plate heat exchanger

Biological Heat Exchangers

Some of the most influential inventions come from observing natural phenomena. Heat exchangers are no different, as they are present all across the planet, including the animal kingdom. In fact, you are breathing through one right now. As you inhale cool air through your nose, warmth is transferred from nasal passage blood vessels into that air, and you exhale warm air. These circulatory system heat exchangers are also found in animal ears, limbs, and even special organs (called the carotid rete) to help regulate body temperatures in extreme environments.

How Do Heat Exchangers Work?

Heat exchangers use the principles of thermodynamics to move heat away from (cooling) or into (heating) an area as efficiently as possible. Here, there are 3 main methods of heat transfer at play: conduction, convection, and radiation.

Heat Transfer Methods

North Slope Chillers graphic on the methods of heat transfer

Conduction requires physical contact between solid objects in order for heat to move. A simple example would be a pot on top of an electric stove. Heat is directly transferred from the stove into the surface of the pot. Now to see convection in action, imagine you fill the pot with water. Heat will circulate and move through the liquid molecules so that even the water molecules in the very center of the pot get hotter. The easiest way to understand the process of radiation is to walk outside into the sunshine. Electromagnetic waves from the sun are radiating down on us every day.

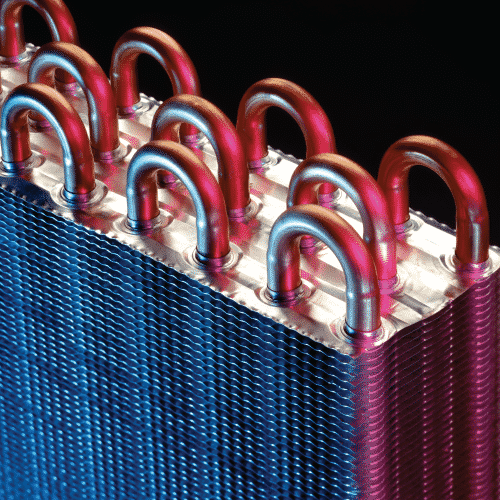
Maximised Surface Area Contact

Using the diagram above, we can see that contact and movement are important heat transfer factors. That means we can improve heat movement with greater surface contact, contact time, and efficient flow. Simply put, greater surface area contact + longer contact time + continuous flow = greater heat transfer. The faster and more efficiently heat is moved, the better. Heat exchangers accomplish this by maximizing both surface area and contact time with a flowing cooling medium (either air or fluids).

North Slope Chillers graphic of a simple heat exchange cross section

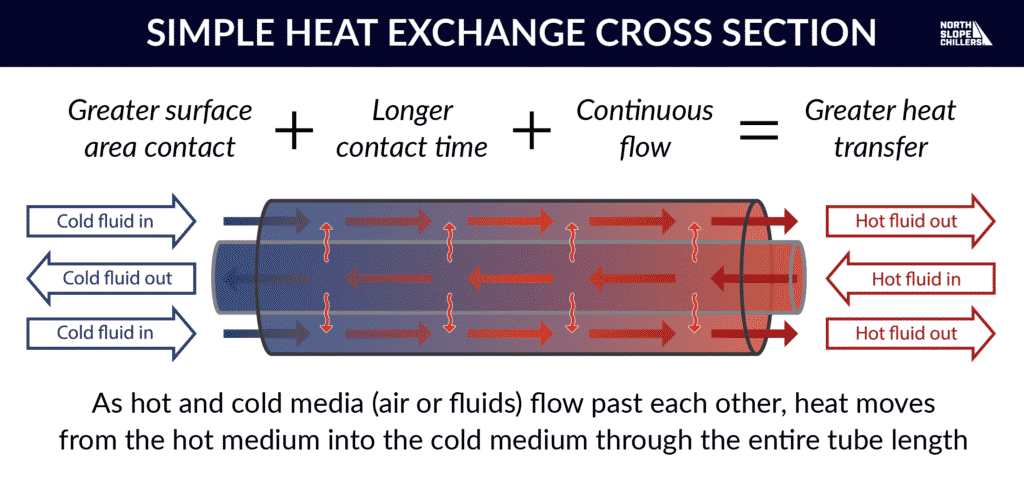
As hot and cold media (either air or fluids) flow past each other, heat moves from the hot medium into the cold medium for as long as they are in contact with one another. Heat exchangers are specially designed to maximise this contact as much as possible within the space provided. Let’s take a look at some of the clever designs used in heat exchangers today.

Types of Heat Exchangers

There are many ways to make and hot and cold media flow past each other. Thermal engineers will use different set ups depending on the thermal load (how much heat needs to be moved and how quickly) for different applications. Using these designs elements, there are an infinite number of possible combinations and flow paths.
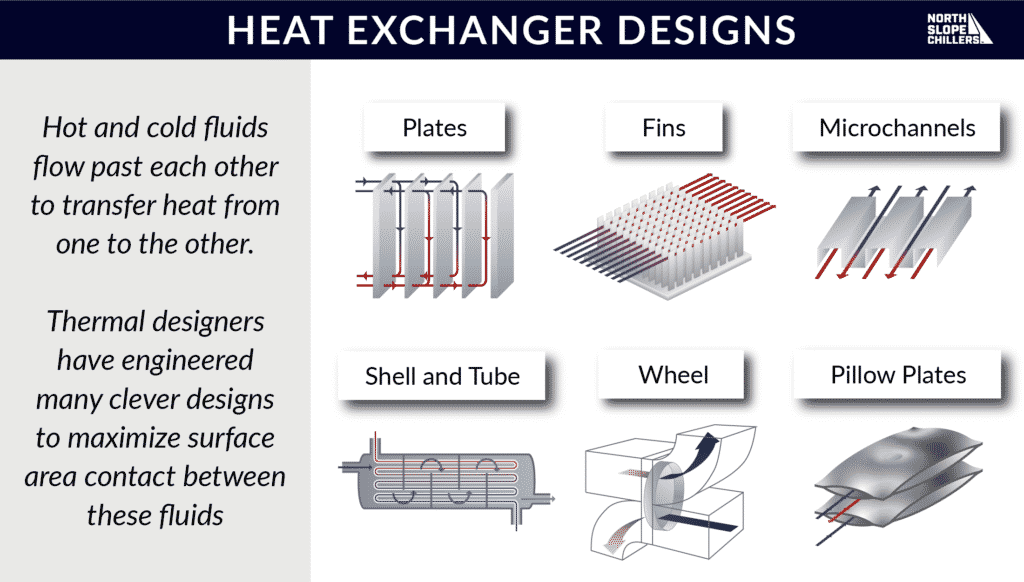
North Slope Chillers graphic on types of heat exchangers

Plates

Some heat exchangers use metal plates that are stacked or lined up in a row. Hot and cold media flow over these plates in an alternating pattern to transfer heat.

Fins and Microchannels

To further increase surface area, these plates can also be textured with microchannels or fins to produce additional flow paths. Instead of flowing uniformly over the metal plate’s surface, the fluid flows along these strategically organized paths.

Shells and Tubes

In this model, tubes of fluid enter a shell filled with an alternate fluid temperature. The tubes perform a series of bends and turns inside to increase contact with the alternate fluid. During its time in the shell, the tube fluid either transfers or receives heat from the shell fluid.

Wheels

This heat exchanger is most commonly used for HVAC applications. Ductwork channels direct outside air and inside air past one another and the exhausts are directed out the other side.

Pillow Plates

Pillow plates are a series of metal plates that are welded together in certain spots to create negative space pockets. A metal plate will have many weld locations and many empty negative spaces in between. 1 fluid flows through those negative spaces, while the other flows in between the pillow plates.

Quality Interior Components from North Slope Chillers

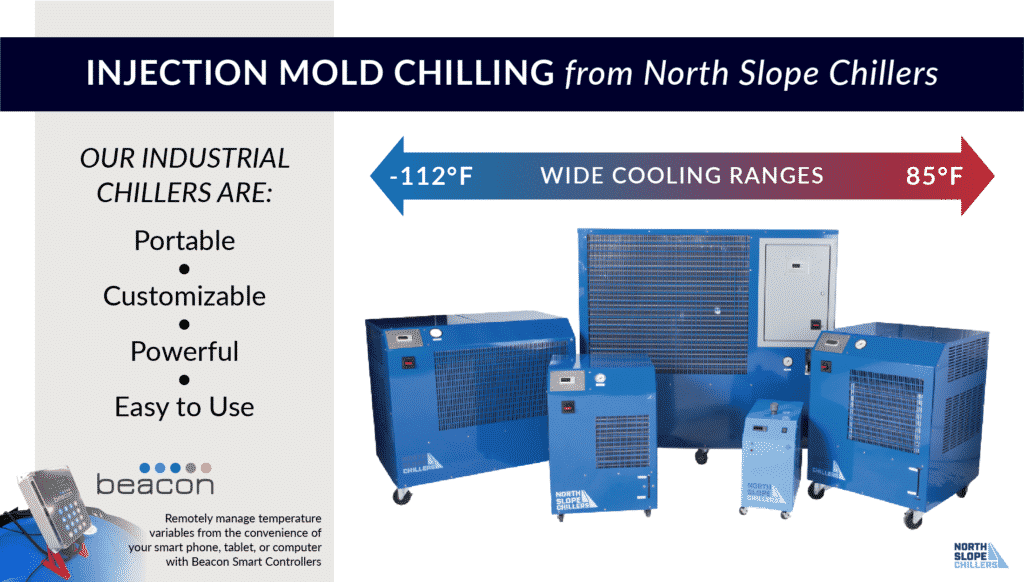
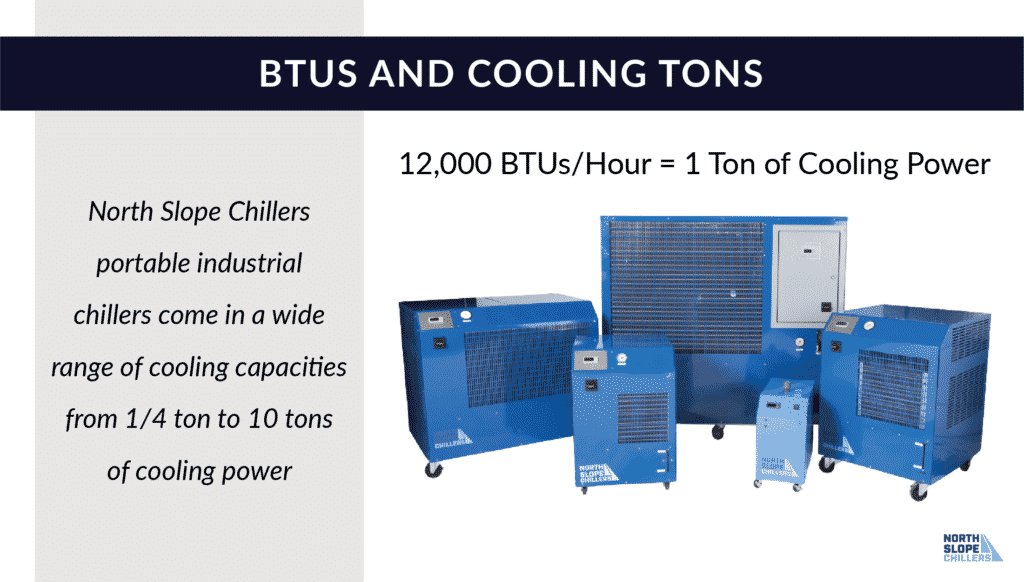
At North Slope Chillers, we know that a chiller is only as good as its heat exchanger. Our powerful and portable industrial chillers are crafted with the best internal components for reliable high performance to efficiently remove waste heat from materials, equipment, and industrial processes. Our chillers are equipped with brazed plate heat exchangers (copper brazed stainless steel) that provide both compactness and heat transfer efficiency. For applications that require deionized chilling, we used brazed nickel heat exchangers to protect you from corrosion. With a wide range of chilling capacities, we can match the exact thermal load of your application. Contact us to find the right industrial chilling solution for your needs at (866) 826-2993 or [email protected]

Temperature Control in Plastics Manufacturing

Brooke Loeffler · Aug 17, 2020 ·

Cooling Molten Plastic

Plastic products today would not exist without careful temperature control for both process heating and cooling. Injection molding requires that some plastics be heated all the way to 550° F. Because of these high temperatures, proper cooling can be one of the most essential steps in the entire plastic manufacturing process.

Learn more about Plastic Injection Molding
Piles of plastic pellets for an injection molding machine

Plastic Cooling Timeline

The plastic cooling and recovery stage can take up around 80% of the total manufacturing time for a single plastic component. Optimizing this cooling stage prevents shrinkage and other plastic defects, reduces production time, creates stronger finished parts, reduces costs, and protects valuable injection molding equipment.

North Slope Chillers graphic about the injection molding cycle

Air Cooled vs Water Cooled

There are 2 main methods for removing heat from around a plastic injection mold: air cooled chilling, and water cooled chilling. 

Air Cooled

Air cooled chilling uses forced air to remove waste heat from injection molding equipment into the surrounding air. Air cooled chilling may be an effective cooling method for low volume plastic manufacturing, however when it comes to high volumes, it is usually insufficient. Air is a less effective heat transfer material than fluid, and will take a long time to cool an injection mold properly before the part is ejected. Air cooling is also a less efficient use of energy because you are paying to cool a larger space instead of directing your cooling power exactly where it is needed. 

Water Cooled

Water cooled plastic chillers run a chilling fluid (usually a mix of glycol and water) directly around the injection mold. Waste heat transfers into the chilling fluid which then continuously returns to the chiller unit where the cycle begins again. Thermal engineers typically draw up precise heating and cooling specifications for an injection molding machine. These temperature control goals depend upon many factors including type of plastic being used, thickness and dimension of the part, and the design of the mold itself. Using a fluid plastic chiller helps manufacturers hit these temperature goals with more precision than if they were using an air cooled chiller. 

Plastic Cooling Strategies

Over the decades, thermal engineers and mold designers have created clever cooling systems to more efficiently remove waste heat from injection molds. The goal is to remove heat quickly and uniformly across the entire mold surface so it can be used again immediately.

North Slope Chillers graphic about the different injection molding cooling strategies

Cooling Channels  

It is essential to eliminate hot and cold spots when chilling an injection mold. Mold designers must not only design for complete cooling coverage but also help the chiller maintain the right fluid flow rate. They accomplish this with a variety of cooling channel layouts that can be categorized into 2 main designs: parallel channels and series channels.

These channels are drilled into the top and bottom of the injection mold and chilling fluid flows through continuously during the cooling and recovery stage. 

Baffles

Plastic parts with protrusions, cavities, cores, and more can be difficult to cool evenly. Mold designers have engineered a few different methods for cooling these 3 dimensional features. A baffle is a cooling channel with a blade that runs perpendicular to the main cooling line. Cooling fluid flows into the channel, up and over the blade, and back down to exit the mold. This baffle allows cooling fluid to get in and out of a cavity or core in the plastic part and cool it from the inside.

Bubblers

A bubbler works similarly to a baffle, except its perpendicular channel contains a small tube instead of a blade. Cooling fluid flows up the tube, “bubbles” out the top, and runs down the outside of the tube like a water fountain. 

Thermal Pins

Another method used to cool cores is a thermal pin setup. A thermal pin is contained within a narrow cylinder filled with fluid. This pin extends down into the main cooling fluid line so it can stay cool. As heat from the injection mold transfers into the cylinder, the fluid inside evaporates and turns into vapor. The vapor then condenses on the cool pin and this cycle continues during the whole cooling and recovery stage. 

Conformal Cooling

Conformal cooling uses a custom tooled mold with cooling channels that follow the 3 dimensional geometry of the plastic part. Mold designers will make these channels conform to specific shapes around the part’s exterior and interior.

North Slope Chillers Plastic Cooling Solutions

North Slope Chillers graphic on injection mold chillers

Contact us to find the right injection mold chilling solution for your needs at (866) 826-2993 or [email protected]

Choosing the Best Hydroponic Chiller

Brooke Loeffler · Aug 10, 2020 ·

Chill and Grow

Over the last several decades, hydroponics has become an efficient and profitable growing solution for all climates and operation sizes. A vast range of hydroponic setups are achievable in dense urban cities, rural areas, and previously un-growable zones. One of the most important pieces of equipment for these hydroponic setups is the reservoir chiller. Hydroponic solution chillers can vastly improve overall plant health, crop output, and profitability. Let’s walk through the process of hydroponic reservoir chilling and the essential qualities needed in a hydroponic chiller.

Download the hydroponics guide
Hand holding a hydroponically grown lettuce plant

Why are Hydroponic Chillers So Important?

Successful hydroponic gardens neutralize the environmental extremes that one experiences with soil gardening and provide healthy and stable growing conditions. Air temperature, humidity, nutrient concentrations, and water solution temperatures should remain constant. Therefore, properly chilling your water solution reservoir is not a luxury, it is a necessity. Ideally, reservoirs should be kept cooler than the ambient air temperature (around 65° F/18° C). 

Chilling Protects Water Solution Health

A hydroponic plant is only as healthy as its roots. Chilling your reservoir to 65° F provides the ideal environment for your root zones to thrive in a number of ways.

North Slope Chillers graphic showing the benefits of using a hydroponic reservoir chiller

Overall Root Health

Hydroponic growing gives gardeners a chance to monitor a critical section of the plant that was previously hidden from view…the root zones. Plant roots need to be permeable enough to absorb everything the plant needs to grow. In addition, the environment surrounding the roots needs to be carefully cultivated to ensure plants don’t absorb harmful substances such as fungi. Chilling the water solution reservoir improves overall root zone health and keeps harmful environmental contaminants at bay. 

Dissolved Oxygen Levels

Dissolved oxygen (DO) is essential for a healthy root system. Aerobic respiration keeps your roots permeable and more able to absorb nutrients. DO also encourages healthy bacteria growth around the root zones, which protects your plants from fungal infections.

North Slope Chillers graphic showing the relationship between dissolved oxygen levels and water solution temperature

Using an air pump and air stone to oxygenate your water solution keeps DO levels up. Chilling your water solution ensures that your DO levels stay up. Anything below 5 mg/L is very detrimental to plants. Using a DO meter to measure oxygen levels in your water solution keeps your roots permeable and protects them from drowning.

Nutrient Absorption

Each crop has different nutrient requirements and scientists have spent decades refining these formulas. Chilling your water solution will increase nutrient absorption across the entire root zone, no matter what nutrient balance your hydroponic garden needs. 

Algae Prevention

The downside of creating the perfect plant growth environment, is that you have created the perfect environment for all plants…including algae. Unfortunately, almost every hydroponic operation encounters algae at some point. If left unchecked, algae spreads quickly, clogs your system, and even becomes toxic to your crop. Algae spores need light, nutrients, water, and warm temperatures in order to thrive. You can’t eliminate light, nutrients, or the presence of water, without damaging your plants. That means using a reservoir chiller on your water solution is the best option for controlling algae growth.

Microbe Balance

Good microbes can help balance out harmful pathogens and fungi from growing in your hydroponic system. Beneficial colonies for specific crops can be purchased and mixed into your water solution at scheduled intervals to inoculate your system and continue to protect it in the future. Keeping your reservoir chilled balances microbial colonies in your favor.

Hydroponic Chiller Specifications

Now we know how crucial it is to chill hydroponic water solutions reservoirs. So what qualities should you look for in a hydroponic reservoir chiller? Let’s take a look at important specifications a chiller should have in order to meet your hydroponic needs.

North Slope Chillers graphic showing what specifications a hydroponic chiller should have

Correct Sizing

Chillers are typically listed according to BTUs or tons of cooling power (1 ton of cooling power = 12,000 BTUs). Use the following calculation to make sure you select a chiller with enough BTUs to match your requirements:

BTU/hr = Gallons x Temperature Change (°F) x 8.33 / Time (hrs)

First find out how many gallons your reservoir holds. Next, calculate how many degrees your water needs to be chilled. For example, if the water coming out of your hoses is 85°, you need a temperature reduction of 20° F in order to hit 65° F. Lastly, find out how long it takes for your reservoir solution to flow through your set up. Larger hydroponic setups will require more cooling power to make sure the reservoir stays chilled as the water solution returns to the chiller.

Easy to Keep Clean

Greenhouses need to be kept clean in order to preserve the ideal growing environment. It is important to select equipment that is easy to keep clean so you can reduce the chance for mold, mildew, algae, or pests to thrive.

Non Corrosive Components

Be sure to choose a chiller with non-corrosive interior and exterior components. Non corrosive exteriors help with your cleanliness requirements (as mentioned above). Non corrosive interior components won’t leach metal contaminants into your nutrient solution.

Portability

One of the benefits of hydroponic gardening is the flexibility you have to change layouts and add more plants without uprooting your crop. Your hydroponic chiller should not interfere with your ability to adjust your layout as needed. Portable chillers give you the freedom to make changes without disrupting your cooling system.

Reliable Thermostatic Controls

It is important to choose a chiller that allows you to set desired temperature ranges instead of just running all the time. Running a chiller unnecessarily not only drives up your energy costs, but can also overchill your nutrient solution and damage your crops. Select a hydroponic chiller that gives you the ability to cater to your exact temperature needs.

Automation/Smart Control Options

There are a lot of variables to monitor in a hydroponic greenhouse: ph levels, nutrient levels, humidity, air temperature, water solution temperature, crop output, and more. The last thing you need is a reservoir chiller that requires constant babysitting. Choose a chiller that has options for automation and smart temperature controls that relieve stress and free up your valuable time.

Recirculating Fluids

One of the greatest advantages of hydroponic gardening is high yield results for low water consumption. Your watering system carefully recirculates your nutrient solution to and from the reservoir. Therefore you should choose a reservoir chiller that also has the ability to recirculate its internal cooling fluids.

Hydroponic Chilling Solutions from North Slope Chillers

Looking for a reservoir chiller that meets all of those requirements? Look no further than North Slope Chillers. We specialize in portable industrial chillers with a wide range of cooling capacities that will perfectly match your hydroponic needs.

North Slope Chillers hydroponic chilling solutions

Portable Industrial Chillers

• Portability for flexible layouts

• Easy to clean powder coated cabinet

• Wide range of sizes to match any grow setup

• Simple to install and use

• Recirculating fluids to save on water use

• Smart temperature control with Beacon

Fluxwrap Cooling Jackets

• Fully insulated against temperature loss

• Multichannel jackets for full cooling coverage

• Wraps around a wide range of reservoir sizes and shapes

• Simple to install, use, and remove for storage

• Easy to clean vinyl exterior

Contact us to find the right hydroponic chiller for your needs at (866) 826-2993 or [email protected]

All About the BTUs

Brooke Loeffler · Aug 5, 2020 ·

All About the BTUs

What are British Thermal Units (BTUs), and why do we use them as a unit of measurement in the United States? Let’s take a look at the history of the term and how BTUs stack up against other forms of thermal energy measurement.

download our catalog
Burning match equaling about 1 BTU of energy

A Brief History

After the 17th century, as steam powered technology became more common, scientists needed a more precise method of measuring heat. Steam engines require careful calibration and calculation to make sure pressure limits stay within safe boundaries. As a result, British scientists began refining the metrics they used to measure heat energy. The exact origin of the British Thermal Unit (BTU), and who coined it, is unclear. However, engineering publications began referencing BTUs in the late 19th century. It became a standard thermal energy unit for the imperial measurement system. 

Meanwhile in 19th Century France, Nicolas Clement was formulating a unit of heat measurement that became known as the calorie. Calories are now the standard thermal energy unit for the metric measurement system.

What is A BTU?

North Slope Chiller graphic show what a BTU is

A British Thermal Unit (BTU) is the amount of energy needed to raise the temperature of 1 pound of water at sea level by 1 degree Fahrenheit. Measuring heat is the same thing as measuring energy. For process cooling, BTUs are used to measure the amount of energy needed to remove heat.

Today, there are many different units used to measure heat for different applications. According to the US Department of Energy, 1 BTU is about equal to the amount of energy emitted by a single lit match. As an imperial unit of measurement, 1 BTU has equal metric system counterparts. 

  • 1 BTU = 252 calories
  • 1 BTU = 3.29 watts
  • 1 BTU = 1055 joules

Many of us are familiar with using calories to measure units of food energy, watts and joules for measuring electrical energy, and BTUs and horsepower to measure mechanical energy. Let’s take a closer look at energy measurements for industrial coolers.

Measuring Energy for Process Cooling

When it comes to process cooling, industrial chillers take energy measurements one level further…”tons” of cooling. 

What are Tons of Cooling Power?

Why are chiller sizes listed according to tons? Well, the answer lies in the cooling practices of yesteryear. Before the age of electronic air conditioners, here in North America especially, blocks of ice were harvested from frozen lakes and rivers and used to cool homes during the summertime. 1 ton of cooling power was the amount of heat transfer needed to melt 1 ton of ice blocks in a 24 hour period. As cooling technology advanced, we began to shift from stored ice to mechanical chilling. In today’s measurements, 1 ton of cooling power = 12,000 btus per hour. Just like we still measure engines according to “horsepower”, the historical practice of using “tons of refrigeration” stuck around.

BTUs, Cooling Power, and North Slope Chillers

North Slope Chillers is proud to offer 3 levels of chill: Frost, Freeze, and Deep Freeze. These 3 classes of portable industrial chillers, offer an expansive range of cooling power from ¼ ton models all the way up to 10 ton models.

In addition, we are proud to provide the fastest customization process on the market. Our engineers can create tailor made chilling solutions that match your temperature requirements, energy needs, fluid choices and more. Contact us to find the right temperature control solution for your needs at (866) 826-2993 or [email protected]

Data Center Cooling

Brooke Loeffler · Jul 21, 2020 ·

Cool Tech

Data centers are the invisible heroes of our modern digital age. Their presence enables our communications, streaming, downloading, research, work, and play 24 hours a day, 365 days a year. As of 2020, there are around 20 Billion devices currently connected to the internet. These centers serve as crucial hubs for data transmission and storage, and they are becoming larger and more advanced every year.

server cooling solutions
Data Center Aisle

For all electronic and mechanical equipment, greater power consumption equals greater thermal output. Therefore the larger the data center, the more waste heat needs to be removed. Overheating servers crash, go off-line, corrupt data, and can damage expensive hardware. Let’s take a look at the specialized world of data center thermal management.

Ideal Server Environment

Ideally, server rooms and data centers should be kept around 72° F with 45% relative humidity. Computer servers can tolerate slightly higher temperatures (up to 90°), but that leaves no room for heat spikes that can occur due to equipment malfunction, or even an exterior door being left open. 

Chilled Inside and Out

Data center cooling begins deep in the heart of the hardware itself. As internal CPU components generate heat, that heat is collected into a heat sink. From there, fans or liquid cooling tubes transfer the heat outside the computer’s case. Once the server’s waste heat is dispelled into the ambient air, it needs to be removed from the data center itself. From here, industrial air chilling units cool the ambient air and expel the waste heat from the building.

Innovative Heat Dispersal

Some tech companies have innovated environmentally safe ways to reuse this heat instead of just dispersing it into the atmosphere. Repurposing heat also helps fight the perception that data centers are heartless energy hogs. Here are just a few examples of how data centers recycle waste heat:

  • Facebook’s data center in Odense, Denmark pipes waste heat to over 7,000 local homes
  • Telecity’s data center in Paris, France heats an onsite arboretum
  • The University of Notre Dame reuses the heat from from their Research Computing Center to heat a greenhouse and botanical garden

Cool Design Features

Data centers are specially engineered for the strategic flow of cool and hot air. By carefully managing layout and exhaust port orientation, data centers can optimize every BTU of cooling power. 

Raised Racks/Floors

Raised floor to assist cooling in a data center

Data centers often house their server racks on double layered raised floors to facilitate cooling. Cables and wiring are run through the negative space between a concrete subfloor and a removable panelled top floor. Not only does this make it easier for technicians to access wires and cables for inspections and repairs, but this also improves airflow throughout the server room. 

Cool air is forced between the floors and can exit through strategically placed perforated tiles. Perforated tiles are placed next to server rack front and allow cool air flow up into the server room. Efficient air flow is critical for data center cooling management. 

Hot and Cold Aisles

To save energy and optimize air flow, data centers organize their server racks to create hot and cold aisles. Server rack fronts are lined up to directly face air conditioning output. Cold air flows through the server racks removing heat and expelling it out the exhaust in the back. Server rack exhausts are lined up to directly face the ac return ducts.

Immersion Cooling

Some data centers have begun experimenting with immersion cooling. This cooling method involves completely submerging server racks into tanks filled with dielectric liquid or oil. Dielectric fluids are specialized non-conductive liquids through which no electric current can pass. They can electronically insulate even high voltage equipment and prevent arcing. When this fluid is chilled, it also acts as a liquid coolant for the running servers. 

North Slope Chillers Data Center Cooling Solutions

Redesigning server room layouts is expensive and creates problematic downtime. North Slope Chillers is proud to offer powerful portable server room chilling that is easy to install without altering your current system. With a wide range of cooling capacities, we can provide you with the exact temperatures you need to continuously keep your servers running cool. Contact us to find the right server room cooling solution for your needs at (866) 826-2993 or [email protected]

  • « Go to Previous Page
  • Page 1
  • Page 2
  • Page 3
  • Page 4
  • Page 5
  • Interim pages omitted …
  • Page 19
  • Go to Next Page »

Primary Sidebar

Recent Posts

  • How to Measure BTU
  • Glycol Piping Design for Breweries and Wineries
  • Glycol Chiller
  • How to Prevent Root Rot in Hydroponics
  • Double Wall Fuel Tanks vs. Single Wall Fuel Tanks

Recent Comments

    Archives

    • September 2022
    • July 2022
    • June 2022
    • April 2022
    • November 2021
    • October 2021
    • September 2021
    • June 2021
    • September 2020
    • August 2020
    • July 2020
    • June 2020
    • May 2020
    • April 2020
    • March 2020
    • November 2019
    • September 2019
    • August 2019
    • July 2019
    • June 2019
    • May 2019
    • April 2019
    • January 2019
    • December 2018
    • August 2018
    • June 2018
    • May 2018
    • March 2018
    • February 2018
    • December 2017
    • November 2017

    Categories

    • Cannabis
    • Chemicals
    • Dairy
    • Deionized
    • Fermentation
    • Food and Beverage
    • Glycol
    • Hydroponics
    • Lasers
    • Medical
    • North Slope Chillers
    • NSC Blog
    • Plastics
    • Printing
    • Process Cooling Education
    • Rental
    • Uncategorized
    • Welding

    Meta

    • Log in
    • Entries feed
    • Comments feed
    • WordPress.org
    • 1949 South 4250 West
    • Salt Lake City, UT 84104
    • United States
    • Phone: (866) 826-2993
    • Email: [email protected]

    facebook youtube twitter linkedin

    LR Dynamics

    Have A Question?

    phone801.506.0198chat_bubble_outlineLive Chat
    Return Policy
    Warranty Policy
    1949 South 4250 West
    Salt Lake City, UT 84104
    United States
    Phone: (866) 826-2993
    Email: [email protected]

    Footer

    1949 South 4250 West
    Salt Lake City, UT 84104
    Phone: (866) 826-2993
    Email: [email protected]

    Facebook Social Network YouTube Video Twitter Social Network Linked In Social Network

    Recent Posts

    • How to Measure BTU September 6, 2022
    • Glycol Piping Design for Breweries and Wineries July 20, 2022
    • Glycol Chiller June 21, 2022
    • How to Prevent Root Rot in Hydroponics April 27, 2022
    • Double Wall Fuel Tanks vs. Single Wall Fuel Tanks November 23, 2021

    DOWNLOAD THE CATALOG

    $(document).ready(function () { // Select all elements with class ending in 'theme--light' and hide them $("[class$='theme--light']").css("display", "none"); });